Best Smalls in Goblet
While plots in the Goblet are the least popular, primarily due to the esthetics of the neighbourhoods and the fact that none have beachfront zones like the other three current housing districts, since canyon views aren’t as desired as water views, only the plots with the fountain or a great canyon view tend to be sought after.
There are definitely some hidden gems here, with waterfall, fountain or canyon views, but most often, people tend to purchase a plot in Goblet then take advantage of the relocation to go to one of the other housing districts instead.
On the positive side, it can be easy to get one of these better Goblet plots off a placard purchase for a first housing plot, because people prefer the other housing zones instead, which will save you on a relocation cost to a better location.
Goblet 7 / 27
![]() Canyon view from Goblet plot 7 27 on a cloudy day
Canyon view from Goblet plot 7 27 on a cloudy day
This plot has sweeping views of the canyon from the entire plot and has a marketboard and summoning bell right outside the gate.
Goblet 14 / 44
![]() Goblet plot 14 / 44 waterfall view in backyard
Goblet plot 14 / 44 waterfall view in backyard
This plot is located on the main plaza but also the backyard looks out over one of the waterfalls. There is a tall canyon wall next to the backyard as well, which makes this plot seem exceptionally private, despite being on the central plaza.
Plot 1/31
Goblet plot 1 / 31
This plot tends to be a love it or hate it plot. Some love the fact it is right by the entrance to the neighborhood, but others prefer to not have all the players running past all the time. It does offer a fairly nice view of the canyon and has a market board and summoning bell right down the stairs from the plot.
Plot 20/50
![]() Waterfall view at Goblet plot 20 / 50
Waterfall view at Goblet plot 20 / 50
This plot has a waterfall behind that drops into the pool next to the house. There is also a market board and summoning bell right next to it as well as being right next to the center plaza area.
Plot 21/51
![]() View from Goblet plot 21 / 51
View from Goblet plot 21 / 51
This plot has a nice canyon view and the front is fairly private.
![]() Back yard view of Goblet plot 21 51
Back yard view of Goblet plot 21 51
But if you like to hang out in your yard, be aware that the stairs for the neighborhood area come right down behind the house so people will be looking into your backyard a lot.
Платные ретейнеры
Триста девяносто дополнительных слотов для сумок — это много. Однако ремесленники и собиратели, впервые повышающие уровень своих небоевых классов , быстро обнаружат, что этого… просто недостаточно. Нет, если вы держитесь за мебель, Материю, компоненты для крафта и многое другое.
Однако есть вариант для большего «хранилища». Вы можете нанять дополнительных слуг через веб-сайт Mog Station . Да, это означает, что вы тратите реальные деньги — так же, как вы бы потратили на любой дополнительный предмет на Mog Station. К сожалению, это не разовая покупка. «Дополнительная удерживающая услуга» — это дополнительная ежемесячная плата в счет за подписку. В частности, это стоит 2 доллара США в месяц на одного ретейнера . Вы также можете нанять на пять человек больше, чем ваши два бесплатных подарка, всего до семи вспомогательных NPC.
Это довольно много дополнительного места в сумке! Но я не рекомендую это делать. Нет, если вы просто хотите расширить свой инвентарь. Ценность дополнительных слуг больше связана с их предприятиями: специальными миссиями по сбору предметов для крафта и т.п. Для их завершения требуется реальное время (от одного до 18 часов). Таким образом, чем больше у вас будет ретейнеров, тем больше денег вы сможете заработать на них.
Это полезно! Но если дополнительная плата вас не беспокоит, лучше просто продать ненужные вещи.
Мастерская Island Sanctuary — бонус за эффективность
Каждый предмет, который вы можете изготовить, имеет до 2 категорий, перечисленных как в меню «Установить повестку дня», так и в описании предмета. Установка предмета для создания, а затем установка другого предмета, относящегося к той же категории, приведет к бонусу эффективности. Это приводит к тому, что 2 из вторых предметов будут созданы без использования большего количества времени или материалов. Это может быть постоянно цепочкой во время цикла, если вы не создаете один и тот же предмет более одного раза подряд.
Предмет, созданный с бонусом эффективности, также добавит к статистике «Groove», которая находится в правом верхнем углу повестки дня Isleworks. Чем выше ваш Groove, тем больше предметов будет стоить при создании. Максимальный Groove можно увеличить, построив ориентиры в Island Hideaway, что еще больше повысит прибыль. Groove полностью сбрасывается после начала нового сезона.
Бесплатные ретейнеры
Ваша первая возможность расширить свой инвентарь появляется на 17 уровне. Все начинается с слуг — живых эквивалентов «банков» или «хранилищ» в таких играх, как Destiny 2 или World of Warcraft . Это означает, что они могут хранить предметы для вас, но вам нужно вернуться в указанные места (в данном случае колокольчики призыва), чтобы получить или сдать предметы инвентаря. Хотя ретейнеры годятся не только для удержания крутых камней.
По умолчанию у вас может быть два фиксатора одновременно. Вам просто нужно нанять их у NPC «Retainer Vocate», который можно найти в рыночных зонах любого крупного города: Аллее Хоукеров в Лимса Ломинса, Бирже Сапфирового проспекта в Ульдахе и киосках к востоку от Этернет-камня Гильдии Кожевников в Новой Гридании. . Тем не менее, вы можете найти больше призваний и колоколов призыва на протяжении всей игры (обычно в небоевых городских районах, таких как Кугане, Кристариум, Идилшир и т. Д.).
В настоящее время у слуг заблокировано 175 ячеек инвентаря за штуку, а также их собственные отдельные магазины для осколков, кристаллов и кластеров, используемых при крафте. Скорее всего, вам не придется беспокоиться о последнем. Нет, если вы не соберете или не купите более 9 999 осколков, кристаллов или кластеров любого одного элемента одновременно. Итак, по сути, это 350 дополнительных «банковских слотов» для ваших NPC, созданных специально для вас.
![]()
У ретейнеров есть и другие функции, не связанные напрямую с запасами. Вы можете потратить валюту под названием Ventures, чтобы отправить их на охоту за предметами. Доступные предметы зависят от того, какой класс вы назначили своему слуге: шахтер, ботаник, рыбак или любой из боевых классов. Все боевые классы имеют доступ к одним и тем же предметам (в основном части монстров, используемые для создания предметов).
Вы также используете ретейнеров для продажи предметов на Market Boards — цифровом аукционе, где другие игроки FFXIV могут покупать ваши вещи по установленным вами ценам. Это один из самых простых способов очистить инвентарь, поскольку большинство предметов продаются за бесценок продавцам NPC. Вместо этого вы хотите получить справедливую рыночную цену от игроков-людей (с деньгами, полученными от Duty Roulettes и тому подобного), удаляя предметы из своего собственного рюкзака. Каждый служащий может одновременно отображать до 20 предметов на доске объявлений, фактически добавляя 40 дополнительных ячеек для сумок.
Руководство по Пагосу для Эврики
Путеводитель по Пагосу (Изображение: eXputer)
Пагос – вторая зона Эврики. Как и другие, игроки могут перемещаться по этой зоне. Опыт прокачки в одиночку в этом обновлении лучше, чем в предыдущих. Вы можете поднять свое здоровье, используя зелье Эврикана. А также вступайте в бой с противниками, которые могут помочь вам повысить уровень.
Эти враги могут включать мутировавших или адаптируемых существ. Вы должны быть в курсе своего окружения, когда исследуете новые регионы Эврики. Старайтесь держаться подальше от любых спящих или замороженных драконов Бездны, если вы вступите с ними в контакт. Это может повлиять на здоровье вашего игрока, что может привести к смерти. Вы можете узнать все о пагосах и различных предметах в прохождении Final Fantasy XIV.
Things to Note with FFXIV Ishgard Housing
In the end, getting a new Ishgard house will depend on pure luck of the draw. In the past, players were able to storm wards and wait around, camping out each plot and generally scoring it if their patience (and connection) were good enough.
With the FFXIV house lottery system in place, however, it’s a simple matter of doing anything else and simply hoping that your number comes up, at which point you’ll be prompted to go claim your shiny new Ishgard house — whether through the Relocation system or via the regular plot purchasing screen.
What’s also worth noting is that the price of FFXIV plots no longer decreases over time, so there isn’t much point in waiting around for a rare available plot to get a little cheaper. Grab it while you can.
We’ll likely have a lot more to share on the FFXIV Ishgard plot situation when they become available on April 12, 2022. Until then, though, consider looking into how to unlock the Final Fantasy XIV Pod mount. It’s a callback to the Nier raids from Shadowbringers, with the unlock method being a little different to what you might expect.
How do I get a house for my Free Company?
To get a house for a Free Company, it’s pretty much the same thing. Click the placard at the desired lot to sign up for the lottery. Note that you can only enter one housing lottery at a time, so if you’re signed up for a personal house, you can’t sign up again for a Free Company house.
Each member of a Free Company can sign up for the lottery as long as they meet the requirements. This means your FC can have several entries on one lot if your FC mates all apply for the same lot.
To qualify for the Free Company housing lottery, you need the following:
- Your Free Company must be at least rank 6.
- Your FC has to have at least 4 members.
- You need the permission within your FC to buy land.
- You need to be in the FC for at least 30 days.
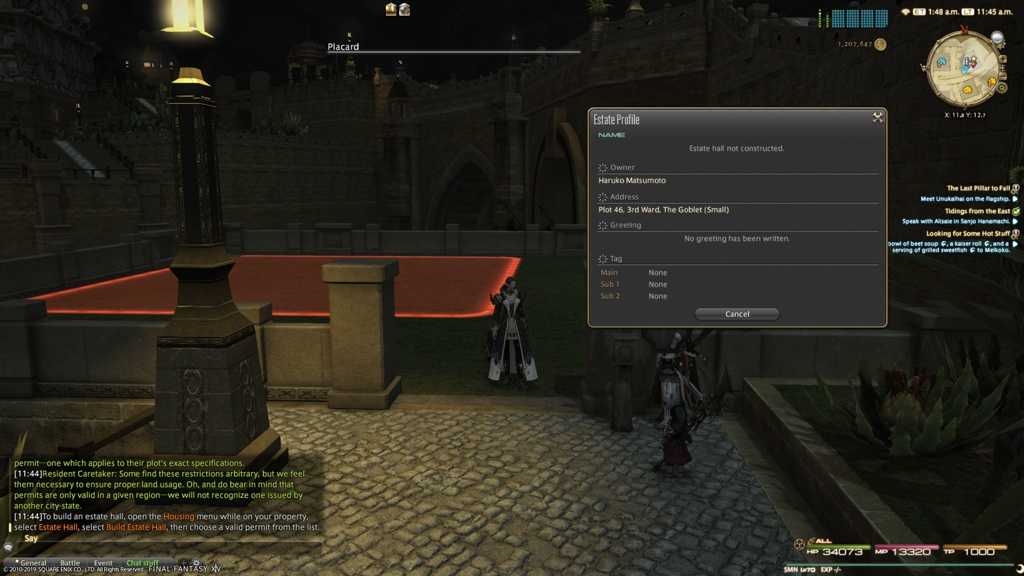
Building an Estate
To build an estate, you must first purchase a plot of land and a construction permit.
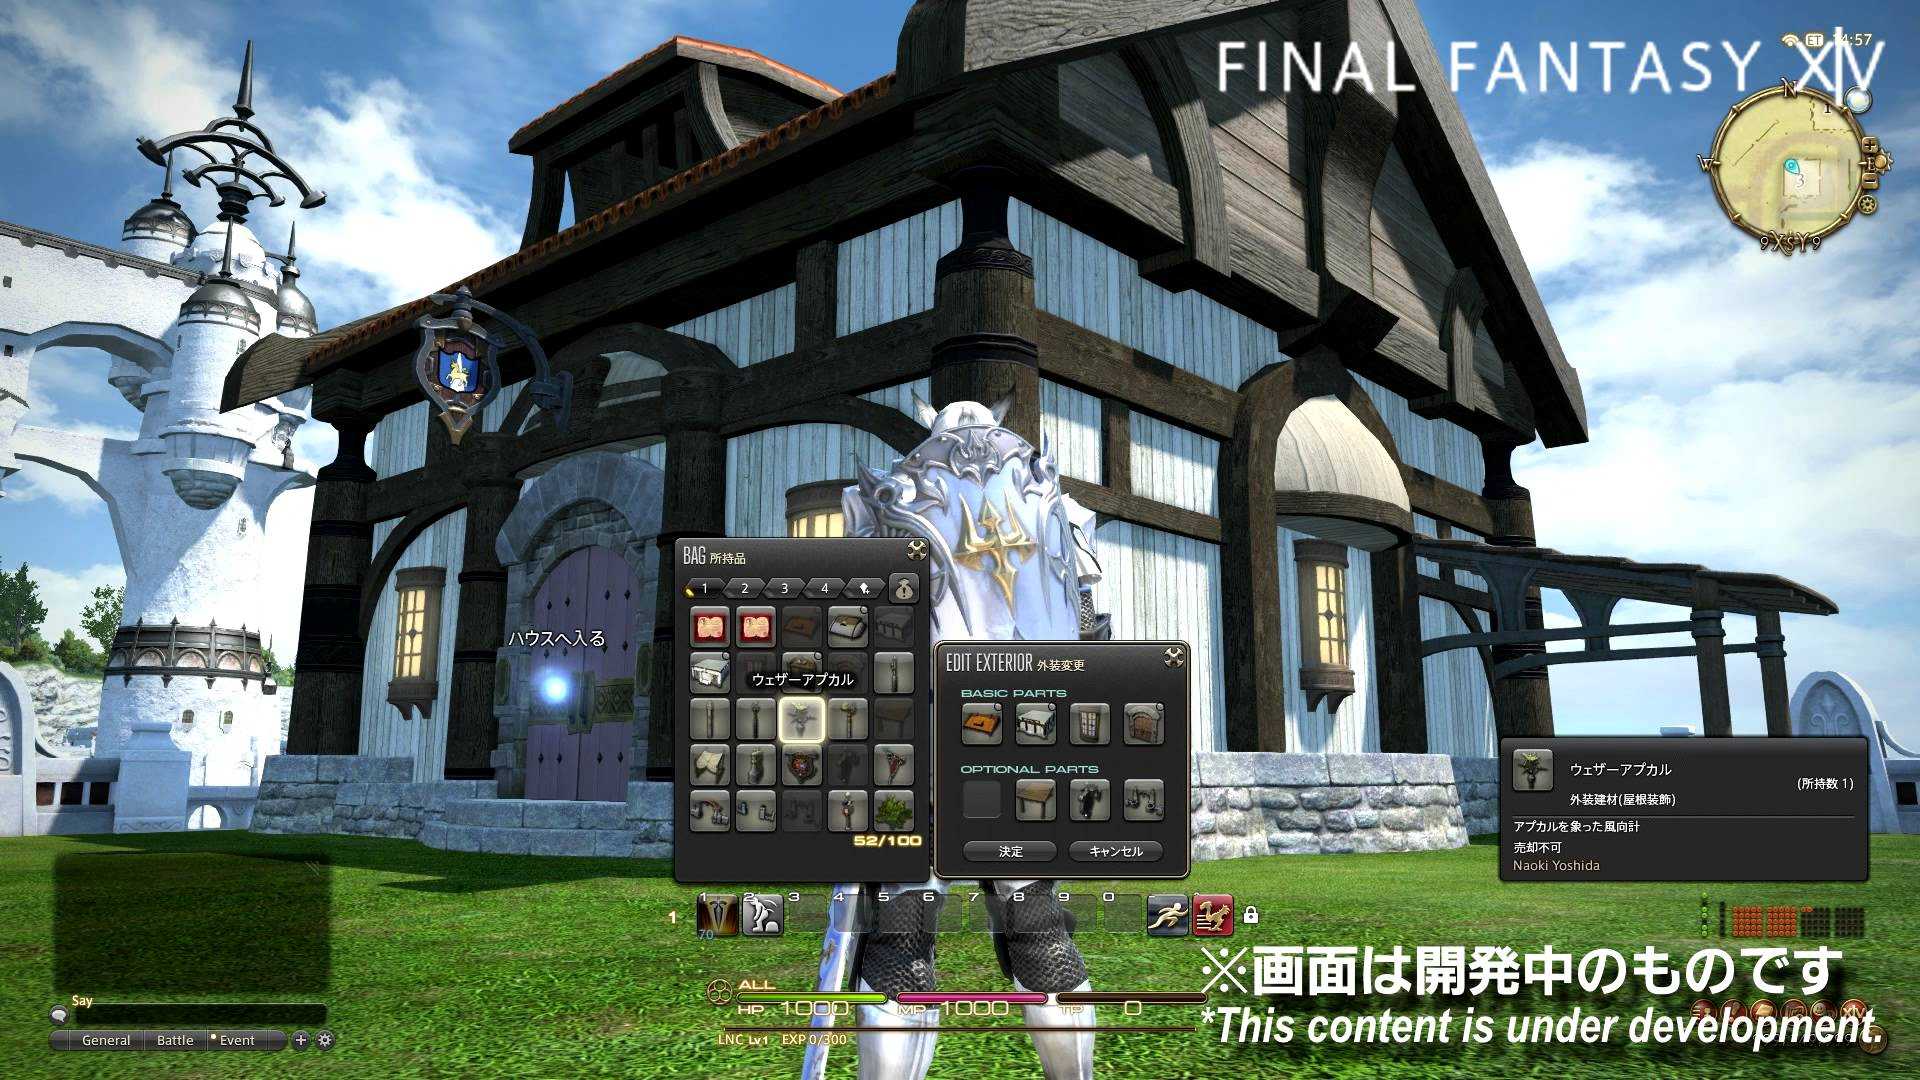
1Select «Purchase Construction Permit.»
![]()
After purchasing a plot of land, open the Social menu, then select «Housing,» followed by «Estate Hall» and lastly «Purchase Construction Permit.»
* A construction permit is required to build an estate on your land.* The price of construction permits varies by type.
![]()
* Construction permits can also be bought from vendors and on the market.
3Use the construction permit to build an estate.
![]()
![]()
From the Social menu, select «Housing,» then «Estate Hall,» followed by «Build Estate Hall» to use the construction permit.
4
Congratulations! All that remains is to enjoy your new estate hall.
FFXIV: Endwalker’s Island Sanctuary Could Possibly Replace Housing
Island Sanctuaries in Endwalker were described as a blank canvas where players can place buildings, gather materials, tend to crops, and have their minion friends freely roam. Caring for animals could mean that players can raise their Final Fantasy XIV Chocobo in the Island Sanctuary, a feature currently only attached to homes and apartments. Players can also grow potted plants in pots in an apartment, but can’t have an outdoor garden like a home can, so perhaps they can raise crops there. Whatever the Island Sanctuary will bring in Endwalker, it will be a nice addition to the social and customization aspects of FFXIV.
All of the details surrounding FFXIV: Endwalker’s homes and cozy farmland haven’t been revealed yet, but all of these changes sound mostly positive. Island Sanctuaries have the possibility to supplement or even serve as a replacement for housing. Players may have to steel themselves for disappointment if they plan to enter a housing lottery, though it is a reasonable trade-off for a fair chance at getting a home.
Next: FFXIV’s Entire Story Timeline Of Major Events Before Endwalker
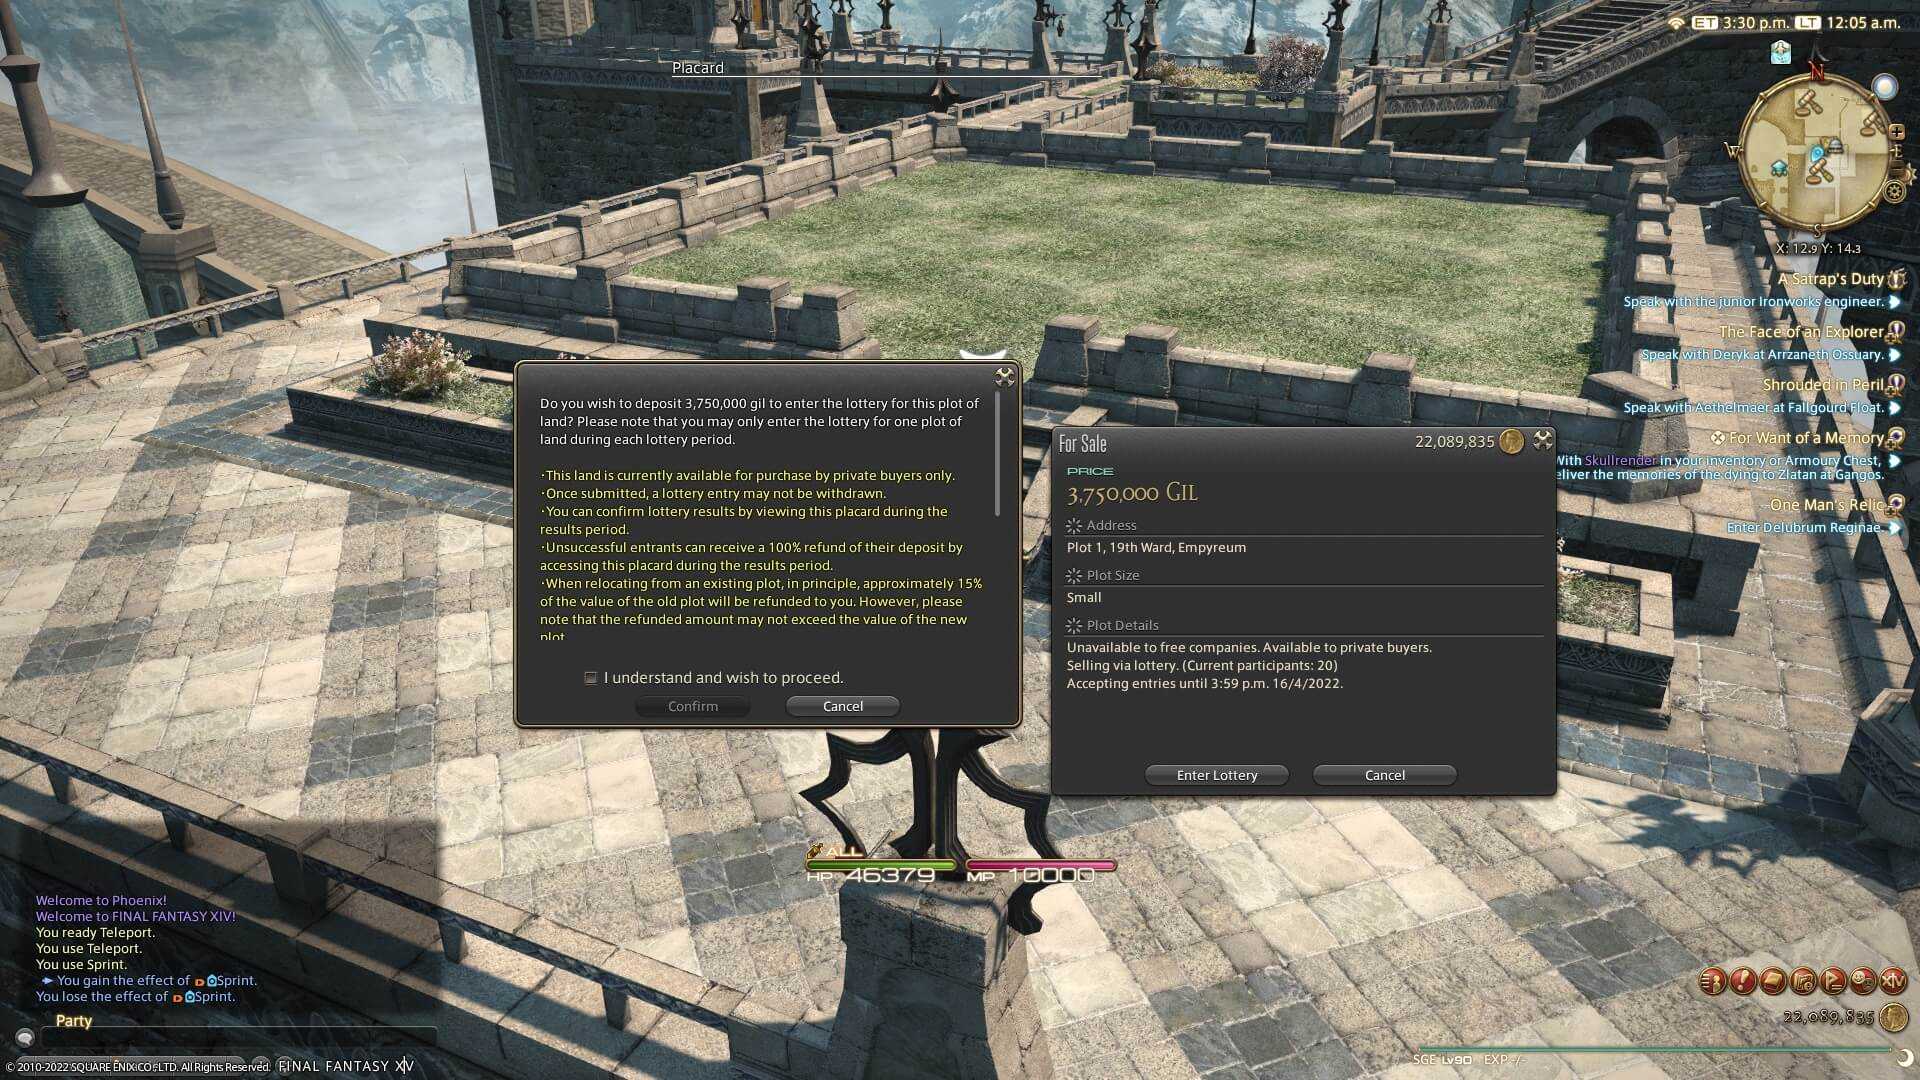
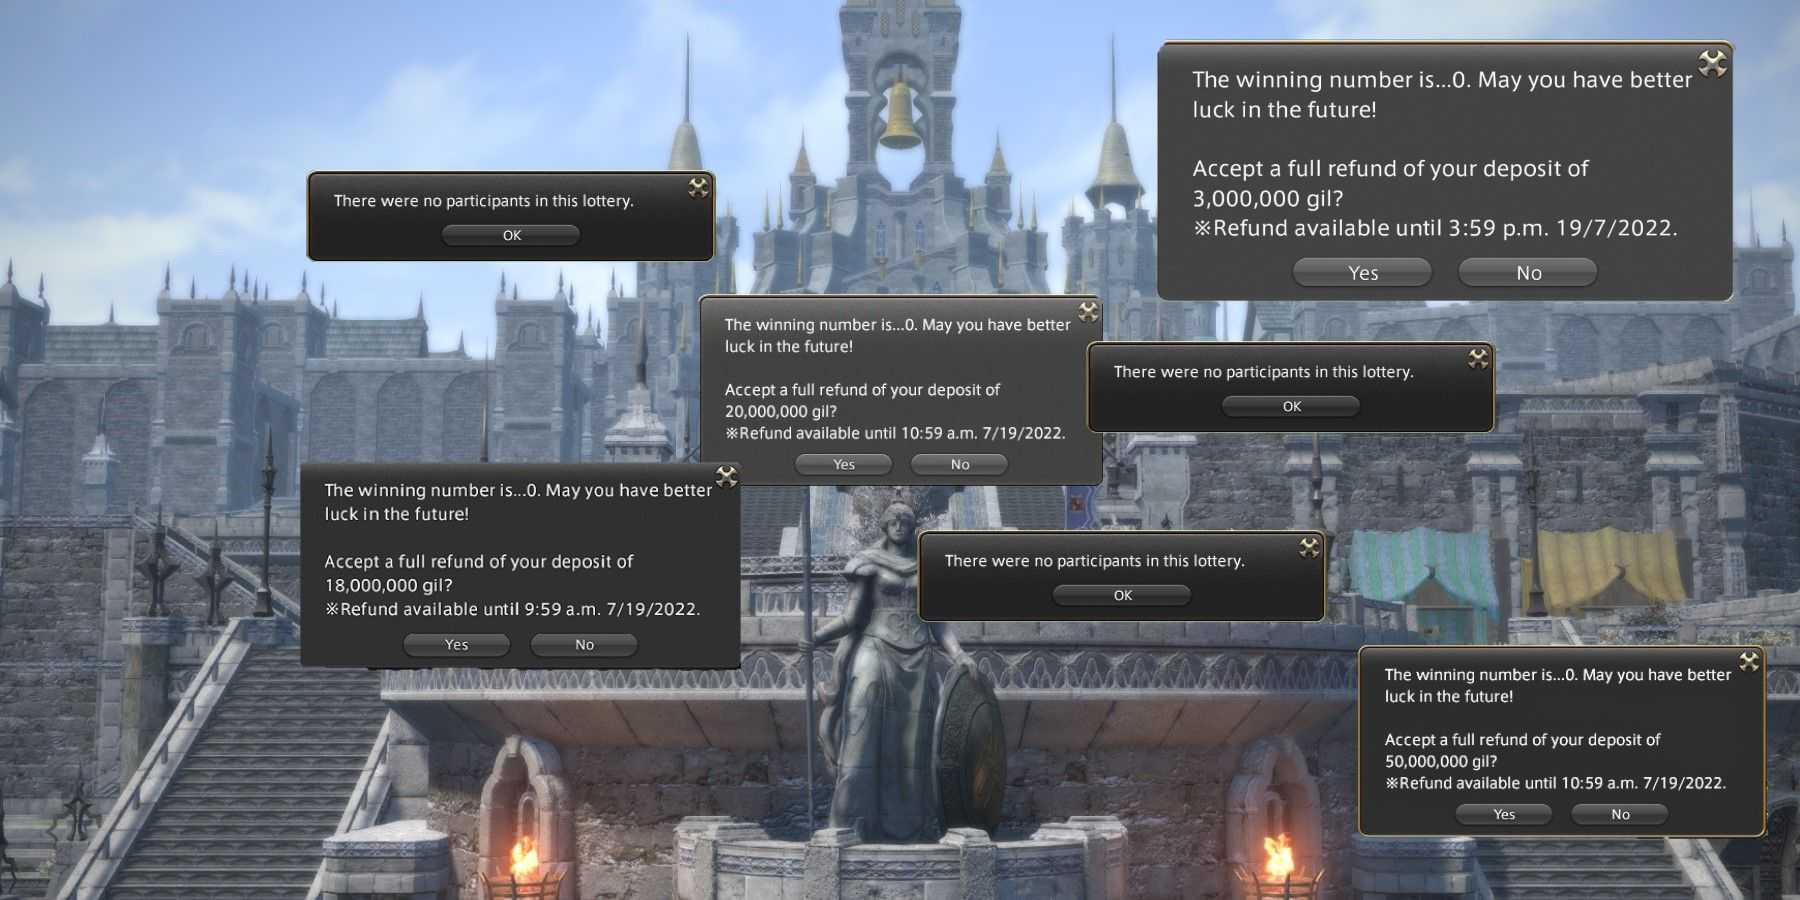
How do I know if I won or lost the lottery?
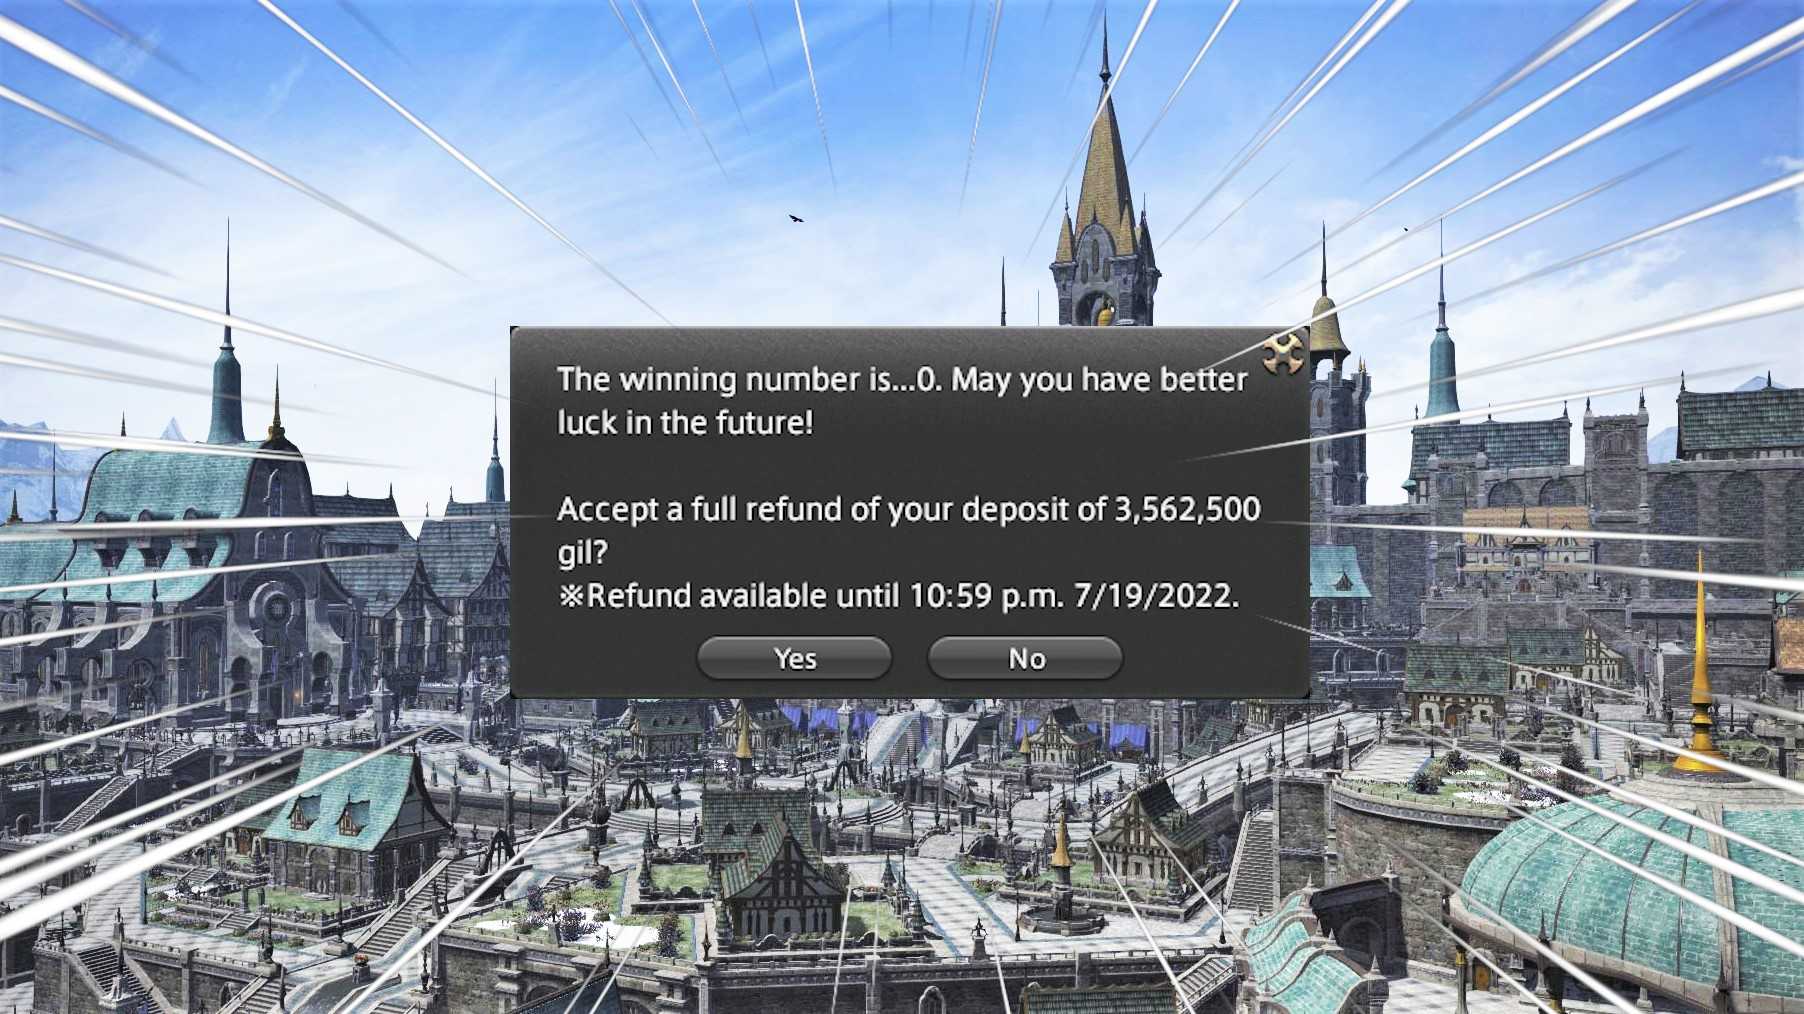
After the four-day results period begins, return to the lot you bid on. The placard will tell you which number is the winner, confirming whether you have won the lottery.
If you win, congratulations! Just complete the purchase from the placard. If you fail to complete the purchase within the results period or decide that the plot is no longer needed, you will only receive a refund of 50% of the gil deposited during the entry phase. If you are buying a Free Company home and multiple members have won multiple lots, you only need to choose one. Anyone else will be subject to the 50% refund policy.
If you lose, you are out of luck. Make sure you return the placard to get your deposit back, it will be refunded to you in full. The game will only keep your deposit for 90 days, so make sure you accept your refund within the allotted time or you will lose all your hard-earned coins. You can then bid on another vacant housing lot in the next lottery cycle.
(Image credit: Square Enix)
What if I want to move or demolish my house?
While Final Fantasy XIV used to give you the freedom to reposition to open up the plot, regardless of the aforementioned stealth timer, that’s no longer the case. If you want to move, you need to shell out gold coins and bid with other people on the plot of land you want. If you win and choose to relocate, you will receive compensation equal to about 15% of the old lot value. Furniture from your old house will be placed in your pantry, whose capacity is temporarily increased to 400 indoor slots and 40 outdoor slots to accommodate it.
If you want to demolish your home, go to the house from the social menu, click on estate settings, and select the estate you want to demolish. Then, you need to choose to give up the land. You need to clean the house before you can do this, and you won’t receive any form of gil compensation for demolishing the house.
There is also an automatic dismantling timer to be aware of. For private homes, failure to visit your home within 45 days will result in the game automatically giving up your property. For a free company home, it will be demolished if no members visit it within 45 days.
Currently, As of December 2021, the automatic dismantling timer has been deactivated, This means you can take long breaks without worrying about your house disappearing. When Square Enix finally reactivates the timer, it will start counting from the number of days you were inactive before the timer was disabled.
Оружие Hydatos: как получить & Создание
Hydatos Weapons: как получить & Создавайте (Изображение: eXputer)
Игроки могут посетить Страну Эврика, чтобы приобрести превосходное оружие и кристаллы для его улучшения. Надежное снаряжение Эврика доступно для покупки после выполнения нескольких заданий. У каждого класса в Stormblood есть уровень реликтового оружия, который включает в себя оружие Hydatos. Из этого оружия можно сделать величайшее оружие 70-го уровня, известное как оружие Эврикана. Оружие Hydatos намного превосходит стандартное оружие 70-го уровня, даже если оно есть.
Это оружие лучше всего работает в зонах Эврика, поскольку максимальный уровень там составляет 70. В этих областях игроки могут найти элементарные кристаллы, необходимые им для улучшения своего снаряжения. Мы подробно расскажем обо всем оружии Hydratos и его преимуществах в этом прохождении Final Fantasy XIV.
Best In Slot: Полное руководство по снаряжению для эндгейма
Best In Slot: Полное руководство по экипировке End-Game (изображение от eXputer)
Какая статистика требуется классу для работы на самом высоком уровне, определяет концепцию Best in Slot. Эти характеристики определяют потенциальный выход DPS класса и имеют определенные значения на определенных уровнях. Хотя набор экипировки задания часто идентичен, поскольку новое снаряжение добавляется с каждым большим обновлением, дополнительно существует система приоритетов характеристик, которая способствует разнообразию билдов. Вы можете узнать все о механике Best In Slot и снаряжении End-Game в этом прохождении Final Fantasy XIV.
Welcome To Glitch My House
As mentioned before, guides are necessary for housing connoisseurs to make gorgeous rooms. And for the newbies on the scene, you will get familiar with terms like «floating» and learn about the ups and downs of decorating. There are written guides but, thankfully, the community has videos on YouTube for newcomers and veterans to gain some guidance.
While advice on how to do one thing or another is helpful, it’s still a lot for anyone hoping to commit. Nice-looking rooms are achieved by covering up the ugly walls and ceiling with furniture but at the expense of using a basic toolset. And that supports my point: the process of making your home come together over hours of work is not terrible, but rather it’s the system that limits creativity.
Housing Customization
The housing system offers a multitude of various customization options for your housing:
- Exterior fixtures come as separate options (walls, roofs, fences, placards) and also as full sets;
- Interior fixtures (Walls, flooring, lights);
- A wide selection of exterior and interior furniture;
- Some furniture also offers some functionality, such as orchestrions, placeable foods, vendor NPCs, summoning bells, game machines, etc;
- Some furniture, such as functional furniture and “boss trophies”, have a designated limit of “one per estate”.
There are many various sources to obtain furniture to decorate and add functions to your house:
- Vendor NPCs in residential districts are selling some basic furniture as well as orchestrions, chocobo stables, gardens, etc;
- Beast Tribes, once their reputation is high enough, may also offer exclusive furniture, available by their currency vendor;
- Gold Saucer vendors offer game machines and some other exclusive pieces for earned MGP.
Also, most of the fixtures and furniture are craftable. Each crafting profession has its own collection of craftable items, thus making it profitable to level each crafting job:
- Most of the crafting materials for the furniture are gathered in the open world;
- Some exclusive furniture materials can be dropped from some dungeons. There are also dungeons that have furniture as a loot drop;
- Extreme Trials may drop materials for crafting the trial trophies;
- Treasure Hunts can also offer exclusive materials for some furnishing.
Отправляйтесь в захватывающие приключения и преуспейте в своих миссиях с помощью этой Final Fantasy XIV Wiki.
Final Fantasy XIV представляет собой игровой процесс MMORPG, в котором игроки могут строить и модифицируйте персонажей, чтобы продвигаться в игре. В нем есть развитие персонажа путем выполнения задач и получения очков опыта, как и в других ролевых играх. Вы получаете предметы, которые помогут вам в путешествии, по мере прохождения основных и побочных заданий. Наше прохождение Final Fantasy XIV содержит руководства по всем вопросам: от классов, ошибок, локаций, списков уровней, уровней и многого другого.
- Разработчик: Square Enix
- Дата выпуска: 25 мая 2021 г.
- Доступно: PS4, PS5, Microsoft Windows
- Жанр: MMORPG
- Продолжительность игры: 120 часов
How To Get A Construction Permit In Ffxiv Housing?
![]()
How To Get A Construction Permit In Ffxiv Housing?
Total Time: 24 hours
Construction Permit
Before constructing the house, you should get a construction permit. The next steps will guide you on how to obtain a license for these constructions.
Purchase a Permit
After getting till here successfully, you are in, and you can purchase a permit and also have an option to select the type of building you wish.
Build Estate
Finally, it is the last step in this list in which you have to select the ”Build Estate Hall,” and thus, your building is completed in the game.
Estimated Cost: 3000000 Gil
Supply:
- Construction Permit
- Building Objects
Tools:
- Construction Tool
- Partition Materials
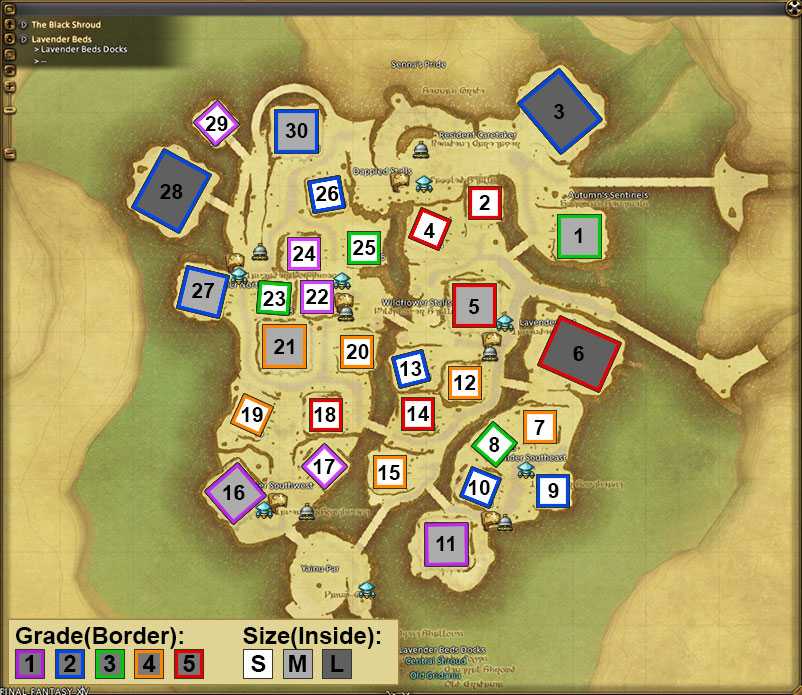
Best Smalls in Lavender Beds
Plot 29/59
![]() Lavender Beds 29 59 overlooking waterfall with a private bridge
Lavender Beds 29 59 overlooking waterfall with a private bridge
This small is at the back of Lavender Beds but it is on its own private island of sorts, with a private bridge to the housing plot with a gorgeous view of the waterfall. This is a very private plot and you will seldom see anyone around your house unless they are specifically looking for your house. This is one of the most sought-after smalls in the game. Some people don’t like the high natural rock walls on the sides as it can block views and make lofting decks impossible.
Plot 9/39
![]() Lavender Beds Plot 9 39
Lavender Beds Plot 9 39
This small is not to far from the much-coveted medium 11/41 plot. It is right on the water and looks over a waterfall.
Plot 7/37
![]() Lavender Beds 7 37, showing view from left side of house.
Lavender Beds 7 37, showing view from left side of house.
This plot also looks over the waterfall that plot 9/39 is situated on, but there is the pathway between the plot and the house, as well as an awkward rock placement in the corner closest to the waterfall. But still one of the better plots.
Plot 17/47
This plot overlooks the dock area and has a huge front area for gatherings and quick access waterfront areas for hanging out too. The summoning bell is out front and the market board is also nearby. This is also coveted for a Full Company member whose FC owns the nearby Medium plot.
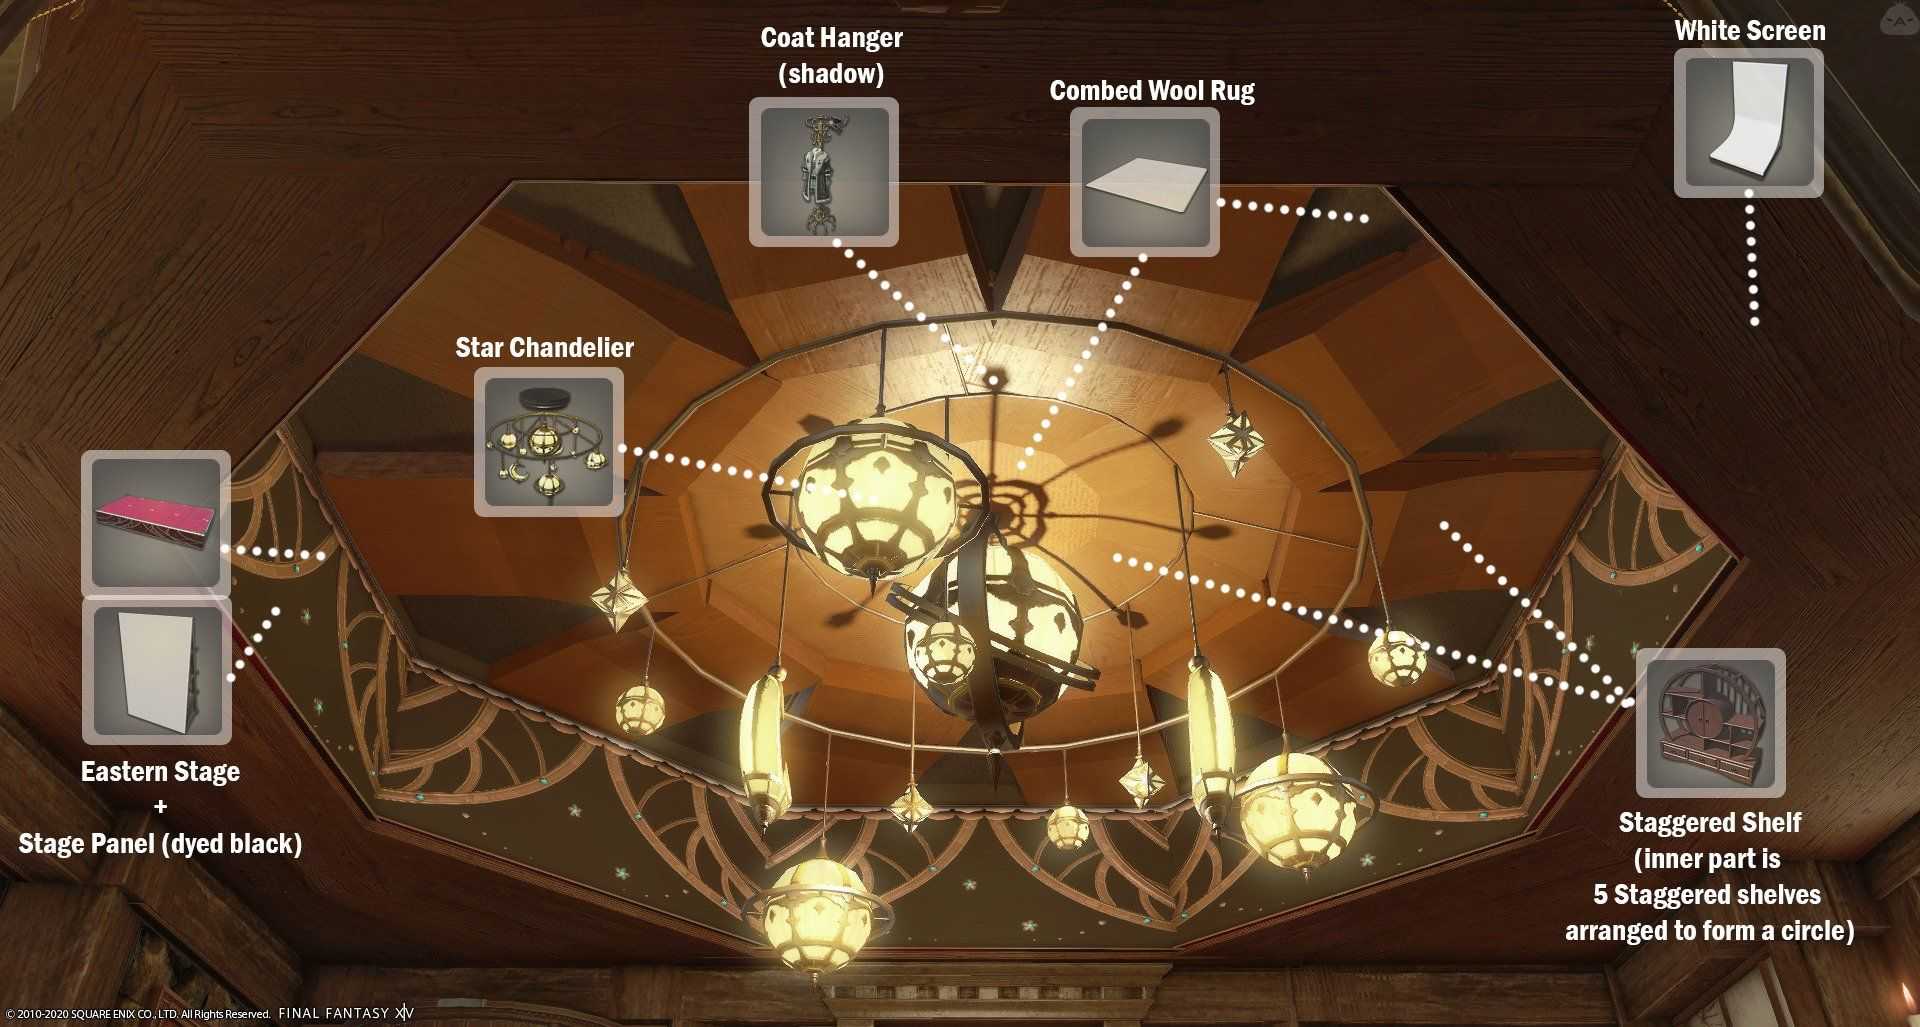
Предметы для использования
Эти предметы часто используются для сбивания мебели.
Рекомендуем ознакомится с другими гайдами на популярные игры tattoo-mall.ru. Расскажем про секреты и хитрости, которые можно использовать в играх со своей выгодой. А также про полезные и интересные историй в видеоиграх.
- Коврик Oasis Leaf: можно приобрести у продавцов жилья.
- Восточный круглый стол: Можно получить с помощью крафта или с доски рынка.
- Стеновые полки Rivera : их нужно изготовить или купить на бирже.
- Сценическая панель : может быть куплена любым продавцом жилья.
- Деревянный чердак: его нужно изготовить или купить на доске объявлений.
- Белая прямоугольная перегородка: создайте или купите в Market Board.
Сбор ресурсов в Диадеме (The Diadem)
Одна из особенностей Восстановления Ишгарда – огромная локация для собирателей под названием The Diadem. Там игроки могут насобирать много Skybuilders’ Scrips и материалов для продажи или крафта. Попасть в эту зону могут все игроки, которые разблокировали Восстановление Ишгарда и достигли 10 уровня в профессии собирателя.
Стоит отметить, что Диадема является хорошим вариантом для прокачки ремесленных профессий без необходимости заботиться о подборе подходящей вашему классу экипировки. Кроме того, там вы всегда сможете насобирать материалы для продажи.
Общая информация о Диадеме
Основная цель сбора ресурсов в The Diadem – получение материалов, которые можно продать за гилы или использовать для крафта. Кроме того, собирая ресурсы в этой локации, вы быстро прокачаете собирательскую профессию. Попасть в Диадему можно с помощью НПС Aurvael (11,14) внутри Firmament.
Как только вы войдете на локацию, вам придется исследовать ее территории в поисках мест сбора ресурсов. Полученные материалы необходимо «зарегистрировать» у НПС Flotpassant, который стоит неподалеку от Aurvael. Лишь после этого вы сможете использовать их для производства предметов.
Если вы только начинаете знакомиться с этой локацией, вам может показаться, что из точек сбора выпадают случайные ресурсы. Но это не так. Каждый из собирательских узлов можно «копать» до 5 раз. Вскрыв его в первый раз, вы видите только первый материал. Вам нужно забрать его и «копнуть» еще раз, чтобы получить второй материал, и так нужно делать все 5 раз.
Ввиду того, что в одном собирательском узле есть 5 разных предметов, игроки не могут фармить какой-то один из них целенаправленно. При желании вы можете уничтожать конкретных монстров в Диадеме с помощью Aetheromatic Auger, чтобы получать нужные вам материалы.
Одна из особенностей этой локации – частая смена погоды. Каждый погодный период длится 10 минут, а изменения погоды происходят через каждые 20 минут. Погодные условия влияют на появление особых узлов (легендарных), из которых выпадают редкие материалы. Один легендарный собирательский узел можно открыть только 1 раз в течение одного погодного периода. Но он будет обновлен после следующего изменения погоды.
Обратите внимание! В связи с выходом дополнения Endwalker некоторые данные с таблицы и карты могут не быть на 100% достоверными. Это в основном касается числовых значений
Прокачка в The Diadem
Если вы решили прокачать профессию в Диадеме, то готовьтесь к тому, что это будет немного тяжело, однако в этом случае вы получите намного больше опыта профессии, чем если бы занимались прокачкой на обычных локациях. Как мы уже говорили ранее, вы не сможете целенаправленно фармить определенные ресурсы с собирательских узлов без использования Aetheromatic Augur. Из точек спавна материалов будут выпадать предметы, соответствующие вашему уровню.
Вся суть прокачки ремесла в Дадеме заключается в исследовании островов и сборе ресурсов. За эти простые действия вам будут начисляться очки опыта. Что касается снаряжения для героя, то вы можете не беспокоиться об этом до 60 и 80 уровня.
Очки Skyward Score
На 80 уровне в Диадеме, помимо материалов, игрок будет получать очки Skyward Score, которые нужны для получения нескольких достижений. За них полагается такая награда как титулы, миньоны и ездовое животное за 500 000 Skyward Score.
Игроки с профессиями Mining и Botany потратят много времени на то, чтобы накопить 500 000 очков. Единственный способ ускорить этот процесс – разбирать узлы с ресурсами до конца.
Как вы уже поняли, очки Skyward Score даются за вскрытие собирательских узлов. Все, что вам нужно делать – перемещаться по локации и разбирать узлы, собирая материалы. При этом вам придется игнорировать «погодные» (легендарные узлы), поскольку они часто недоступны и не дают дополнительных очков. Просто пропускайте их в целях экономии времени.
Типы домов и их стоимость
Игроки могут приобрести жилье как для личного пользования, так и для Free Company. В целом, никаких различий между этими категориями недвижимости нет.
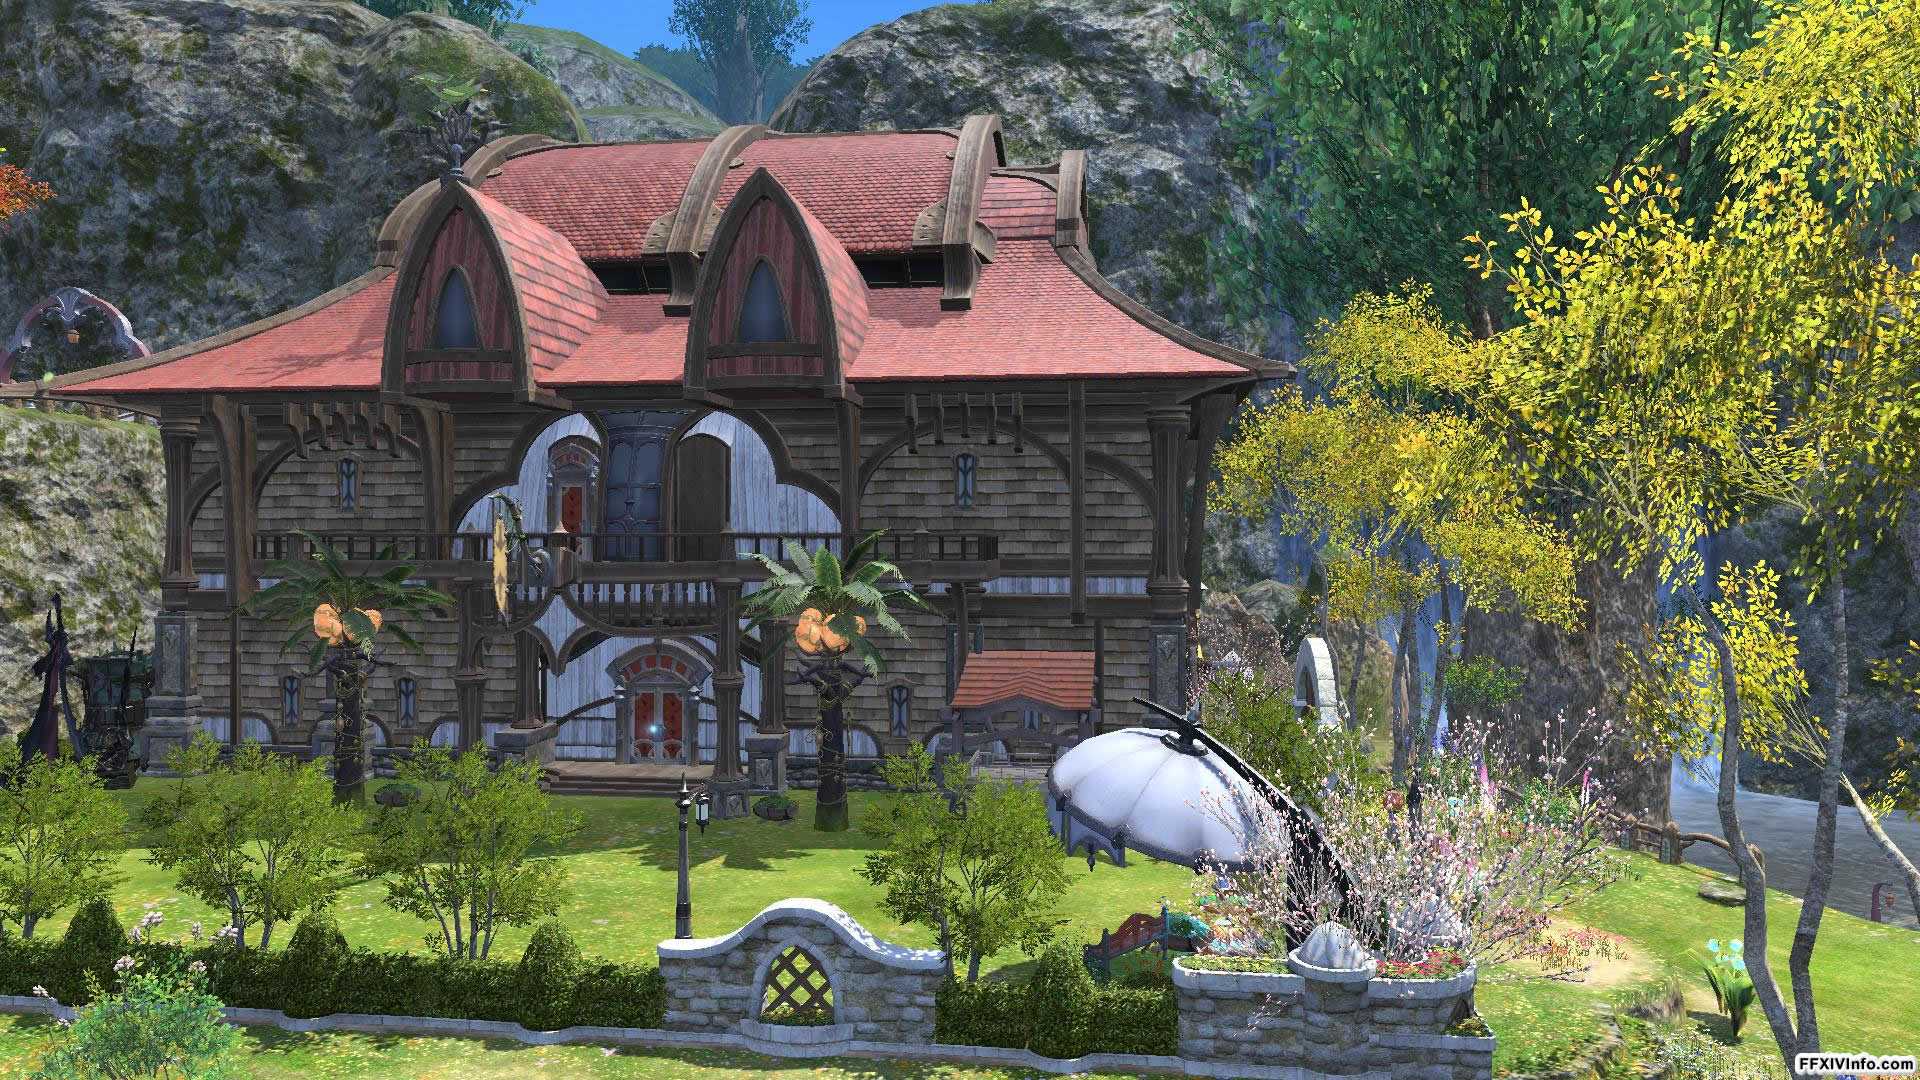
Все дома в Final Fantasy 14 отличаются друг от друга размерами:
- Маленькие – коттеджи (Cottages). Миниатюрная недвижимость с минимальной стоимостью. Имеет цокольный этаж и подвал;
- Средние – обычные дома (Houses). Жилье нормального размера, которое стоит довольно таки приличную сумму гил. Имеет цокольный, второй этаж и подвал;
- Большие – особняки (Mansions). Самая огромная недвижимость в FFXIV. Стоит очень дорого и имеет такой же набор помещений, что и обычные дома – цокольный, второй этаж и подвал. Разница между Houses и Mansions заключается в размере этих помещений. У особняка они гораздо просторнее.
Сколько стоит жилье в Final Fantasy 14?
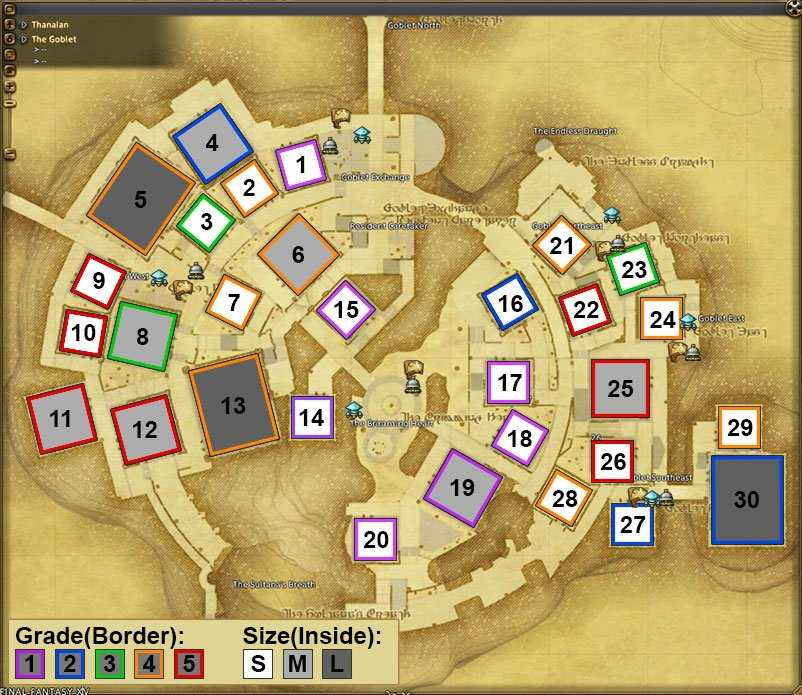
Каждый тип дома имеет определенную стоимость, которая зависит от того, в каком регионе находится эта недвижимость. Кроме того, есть так называемые «классы» земельных участков. Они влияют на местоположение дома на локации. Стоит отметить, что дешевый участок земли не означает, что он плохой
Стоимость со временем снижается, если в течение долгого времени никто из игроков не обратил на него внимание
Ниже мы укажем примерную стоимость каждого типа жилья:
- Коттеджи (Cottages) стоят минимум 3 миллиона гил. Максимальная замеченная нами цена составляет 3,75 миллиона;
- Обычные дома (Houses) стоят от 16 до 20 миллионов гил;
- Особняки (Mansions) стоят от 40 до 50 миллионов гил.
После покупки земельного участка игроки должны построить здание. За это взимается дополнительная плата, так как нужно приобрести не только территорию, но еще и разрешение на строительство. Стоит оно:
- 450 тыс. гил для коттеджей;
- 1 миллион гил для обычных домов;
- 3 миллиона гил для особняков.
FFXIV: Picking a class
Source: Windows Central (Image credit: Source: Windows Central)
Final Fantasy XIV differs from some other MMOs out there by letting you train multiple character classes at once. In FFXIV, classes are known as jobs,» inspired by classic Final Fantasy games, and come in a variety of roles and playstyles.
Some jobs start as a basic version, and through story progression graduate into more advanced jobs. For example, to play as the classic Dragoon or Black Mage jobs of other Final Fantasy games, you must start as a Lancer or a Thaumaturge respectively.
Unlike previous MMO Final Fantasy XI, your chose race is purely cosmetic in FFXIV, and has no bearing on your capabilities in battle. Some jobs are also restricted to certain expansions, and can only be unlocked after progressing through the story to that point.
We have a full guide on every job in FFXIV here, but here’s an overview of the main roles you can undertake in FFXIV.
Stormblood
Кровь бури, второе дополнение к Final Fantasy 14, выпущенное в 2017 году, в котором игроки путешествовали в новые области на Дальнем Востоке, чтобы помочь освободить земли, завоеванные Гарлеанской империей
И снова игрокам было предоставлено множество новых областей, контента и испытаний, но, что наиболее важно, это расширение поднимает максимальный уровень до 70, добавляет профессии «Красный маг» и «Самурай», а также вводит механику ныряния и плавания
-
Исследование (SB)
Вы уже догадались — новые зоны означают новые потоки эфира для сбора, но не волнуйтесь, у нас есть руководства о том, где их найти, прямо здесь. Вы также можете найти здесь информацию об особых FATE.
-
ул>
- Где найти все потоки эфира в пиках
Где найти все потоки эфира в Рубиновое море
Где найти все Эфирные потоки в Янься
Где найти все эфирные потоки в Азимской степи
Где найти все потоки эфира в озерах
-

Материал Final Fantasy XIV
Да, материя есть в Final Fantasy XI V, но это не то же самое, что заклинания в Final Fantasy VII . Это честно не является то , что вам нужно беспокоиться о до фактического содержания эндшпиля, что путь мимо рамки данного руководства. Однако, учитывая, что квесты, связанные с этим, можно получить сравнительно рано, я дам краткое руководство.
В некоторых частях оборудования есть слоты для материалов, в которые можно вставлять материалы. Это могут сделать продавцы NPC, или вы можете сделать это сами, если у вас есть класс крафтеров достаточно высокого уровня. Материя увеличивает характеристики: например, Материя сражения увеличивает вашу стойкость, уникальную для танка.
Чтобы создать материю, вам нужно выполнить крафтерский квест 19 уровня «Выковка духа» в Центральном Таналане. После этого? Что ж, когда вы убиваете вещи, ваша Духовная связь для экипированного снаряжения возрастает. Когда он достигнет 100%, вы можете щелкнуть правой кнопкой мыши на этом элементе снаряжения и выбрать превращение его в материал. Обратите внимание, что передача нижнего уровня приводит к более низкому качеству материала. И да, на снаряжение можно наложить больше материи, чем в нем есть слотов, но чрезмерное смешивание — еще одна масштабная (и невероятно дорогостоящая) вещь в поздней игре. Честно говоря, вы можете спокойно игнорировать Materia намного позже
И да, на снаряжение можно наложить больше материи, чем в нем есть слотов, но чрезмерное смешивание — еще одна масштабная (и невероятно дорогостоящая) вещь в поздней игре. Честно говоря, вы можете спокойно игнорировать Materia намного позже.
How FFXIV Housing Ward Reclassification Works
On Sunday, July 10, 2022, FFXIV will change how FC and private housing wards are classified to open up some limited FC districts to individual owners. Once a new lottery cycle for bidding on player housing begins, housing wards 10 through 24 will be available to private buyers.
As of the lottery entry period on July 10, FFXIV housing wards in the Lavender Beds, Mist, Goblet, Shirogane, and Empyreum restrict the purchase of new plots to the following classifications:
| Free Company Housing | Private Housing |
| Ward 1 through Ward 9 | Ward 10 through Ward 24 |
This change only applies to older FFXIV World servers, not to the four new Worlds added to the EU data center in Patch 6.18.
According to the official Lodestone blog, “Housing areas for the four New Worlds added to the European data center will be classified differently. Further details will be announced at a later date.”
Previously, private buyers were restricted to wards 19-24. FCs could buy plots in wards 1 through 18, but many remained empty as demand slowed. In past expansions, FFXIV has limited the buying and relocation process for private buyers to prioritize FC access, lifting the restrictions at a later date. It’s entirely possible this will happen again, opening up all wards for private ownership at some point in the future.
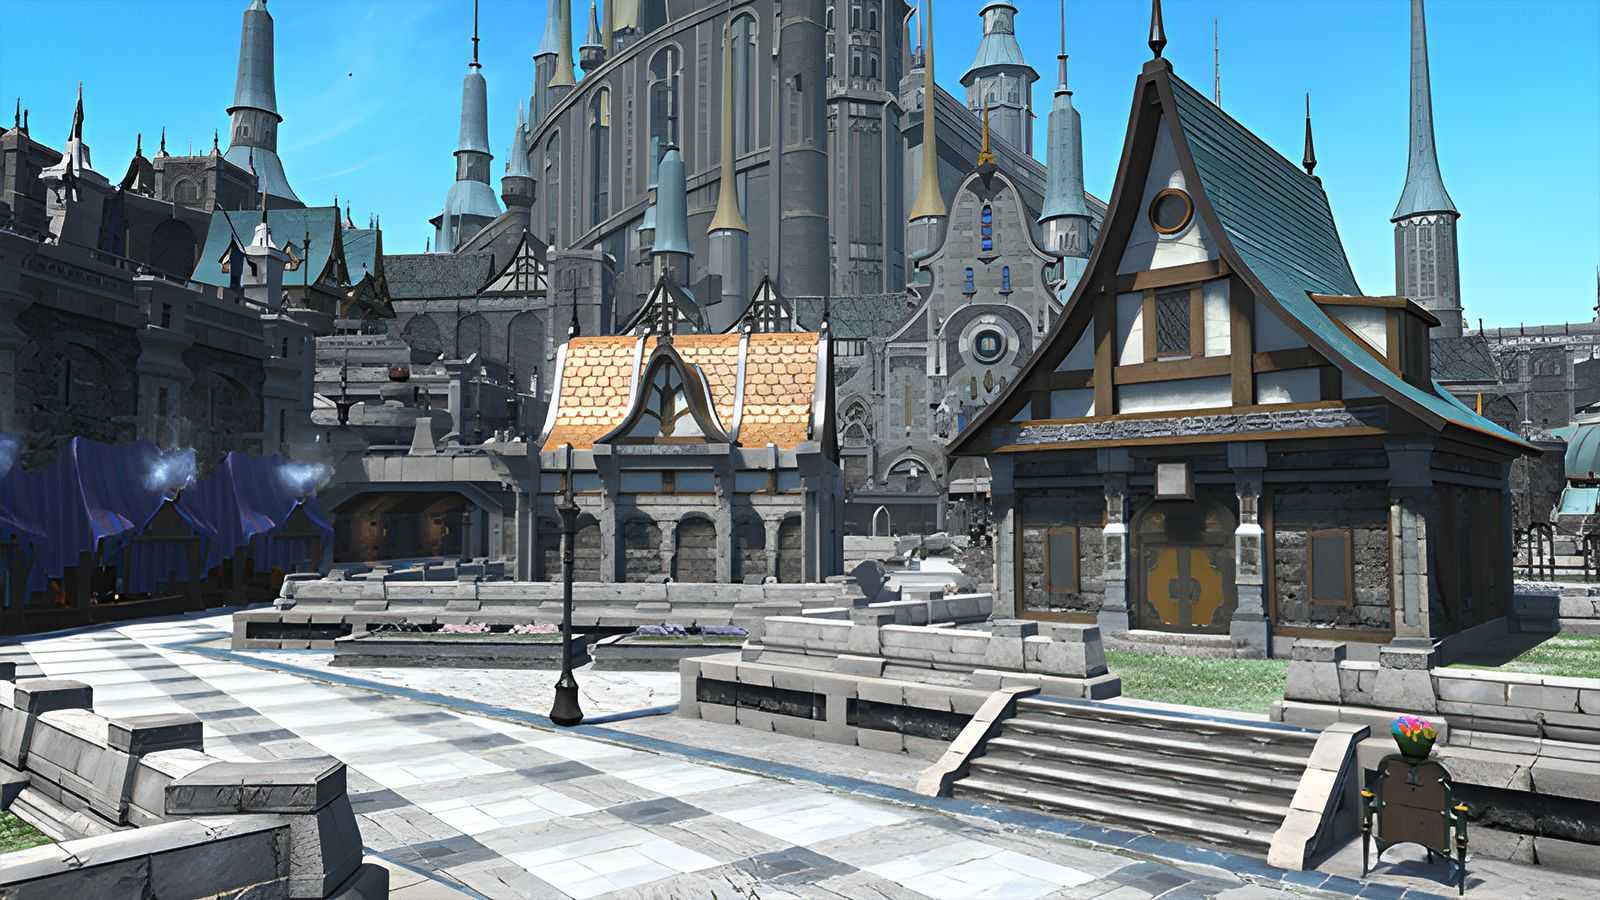
FFXIV: Endwalker’s Empyreum Will Likely Have Apartment Options
![]()
Apartments in FFXIV have been a nice alternative for players unable to purchase a home. It depends on the server and ward, but it’s usually possible to find an apartment space to purchase, and the addition of more is always welcome. When Endwalker’s 6.1 patch arrives, players will be able to look around Empyreum and perhaps see what its apartment complex looks like.
These complexes offer single-room abodes to decorate with exclusively indoor furniture; outdoor furniture is only available for full homes. They also have the benefit of not having a demolition timer. As of right now, inactive players in FFXIV may have their home demolished and put up for sale by the server again if they’re gone too long. This doesn’t seem to be changing in Endwalker, as it’s necessary to return unused homes to the high-demand market.
FFXIV: Endwalker looks like it will offer another nice alternative to housing for players: the Island Sanctuary. This zone seems like it will be instanced to each player, so they have their own unique land to decorate and cultivate. The Island Sanctuary won’t be available right at release but is described in the 6.0 preliminary patch notes and elsewhere as having several features that are still limited to houses.
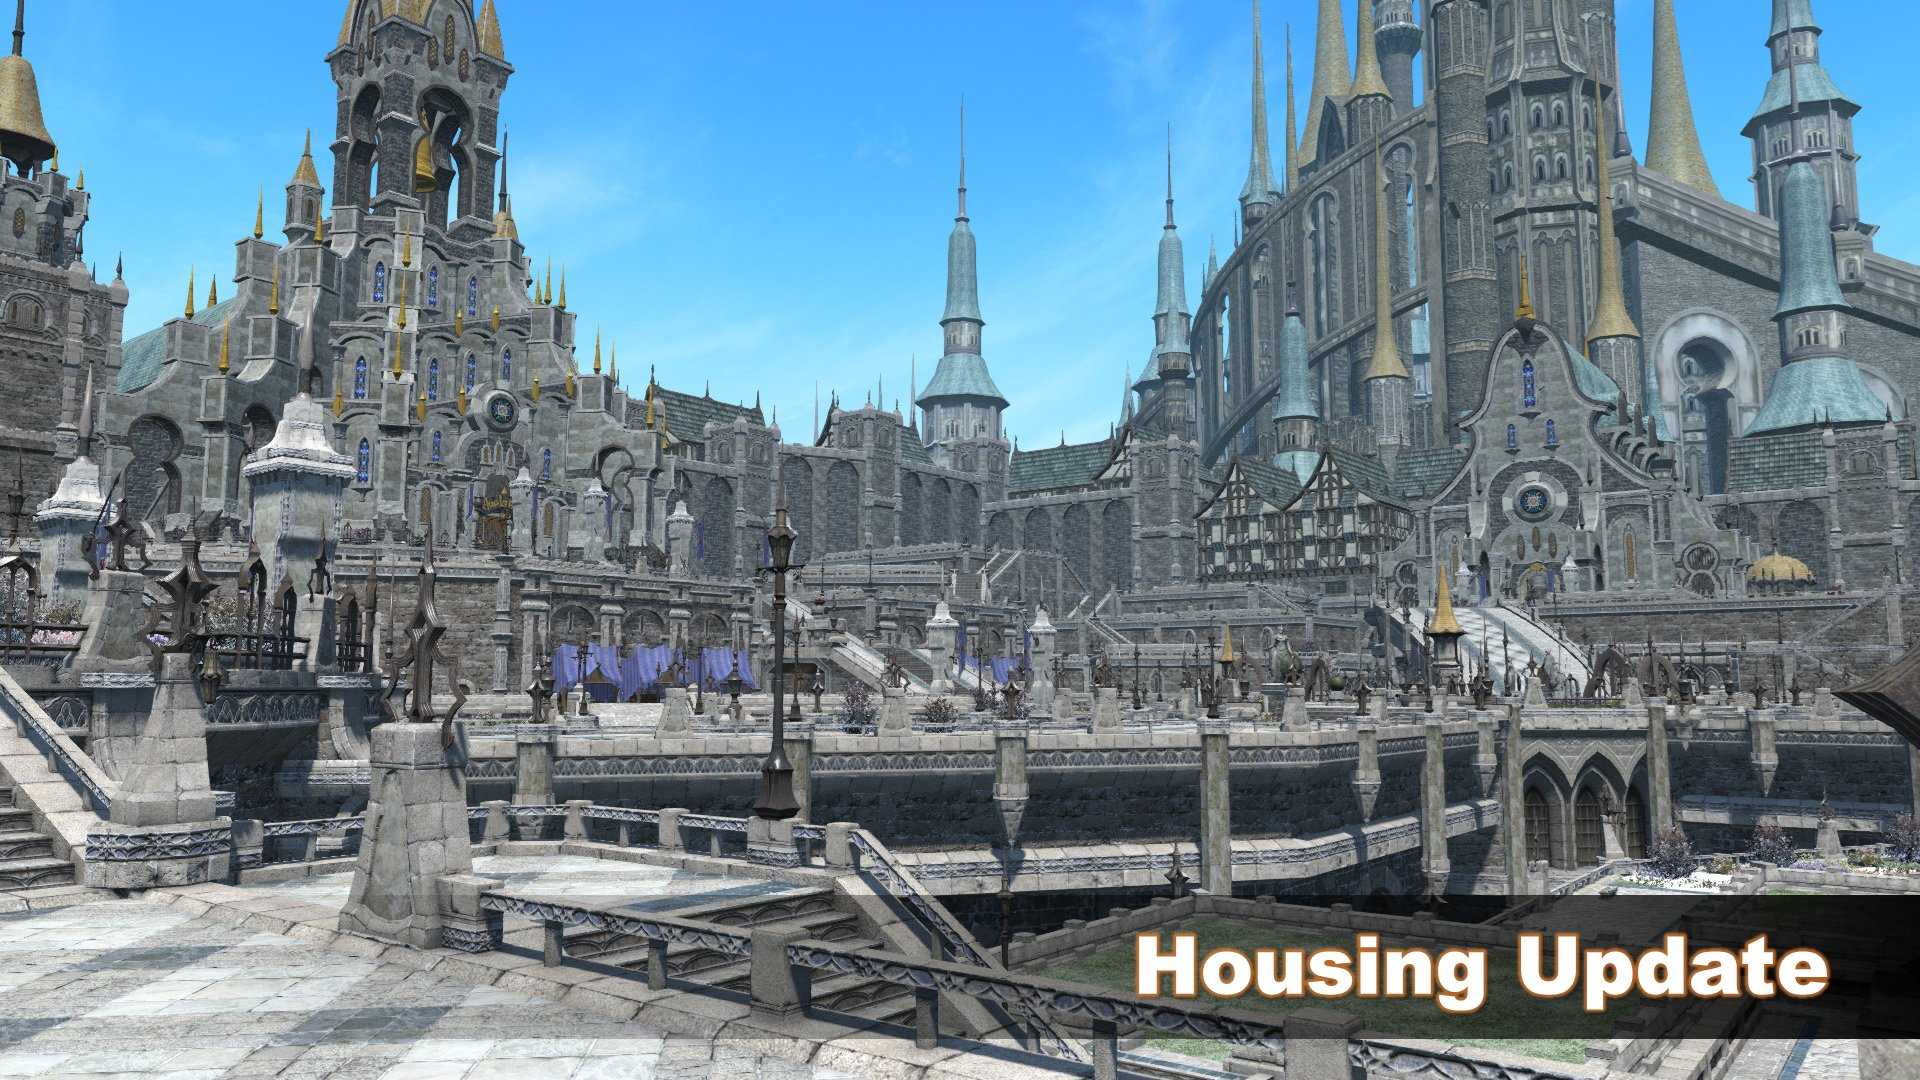
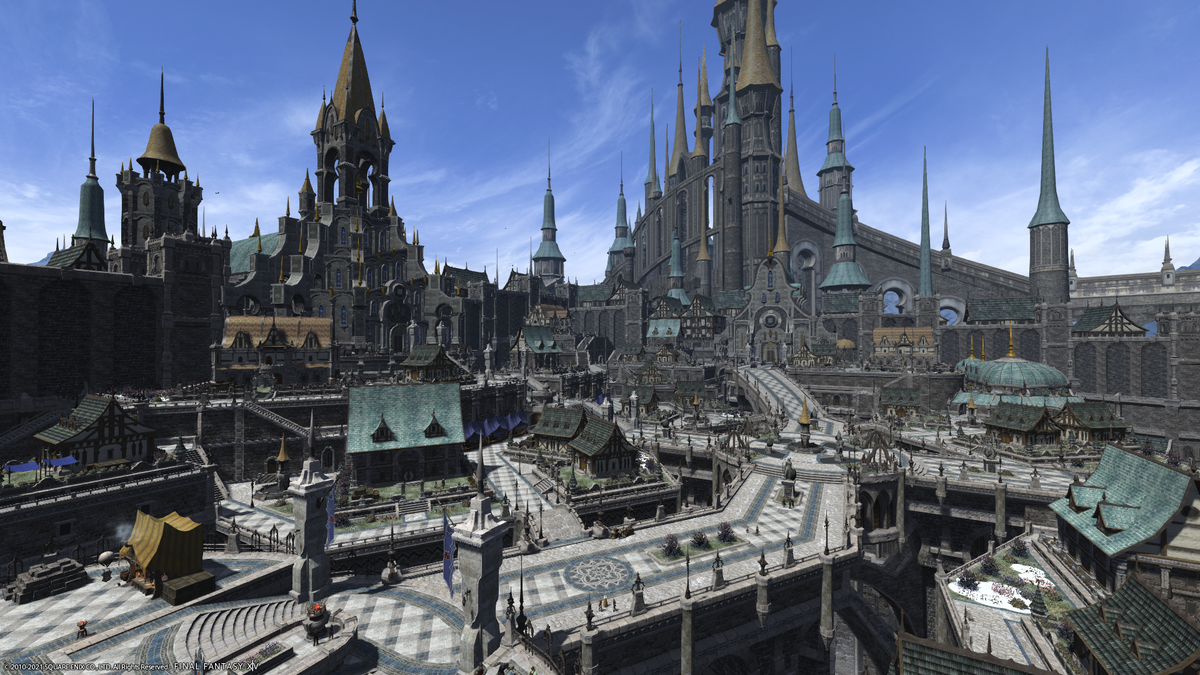
How to unlock each housing district
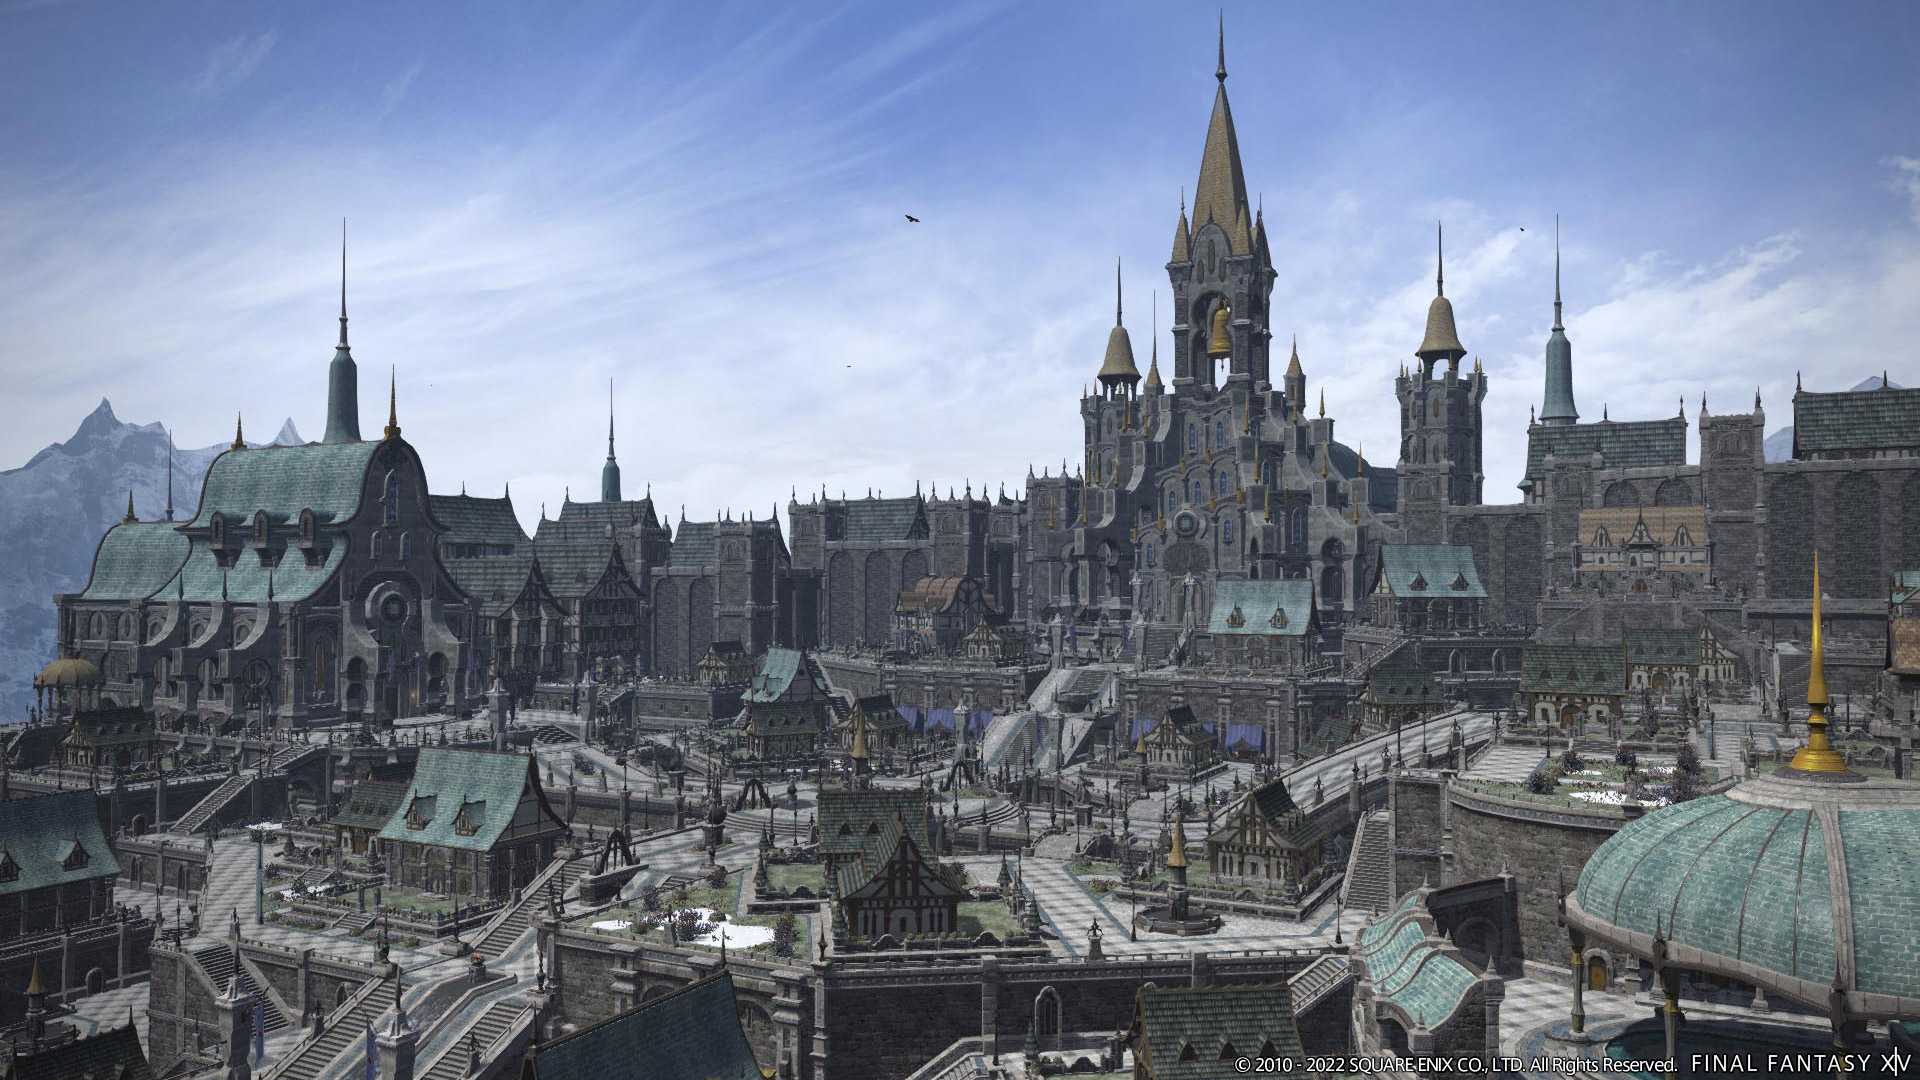
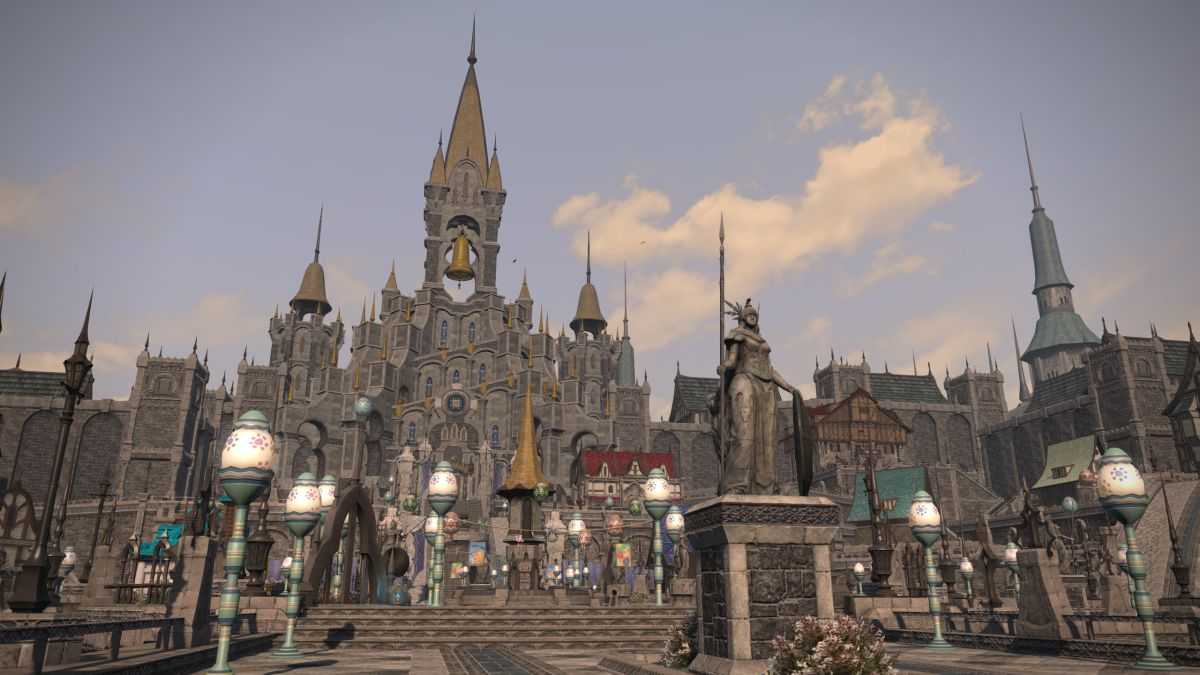
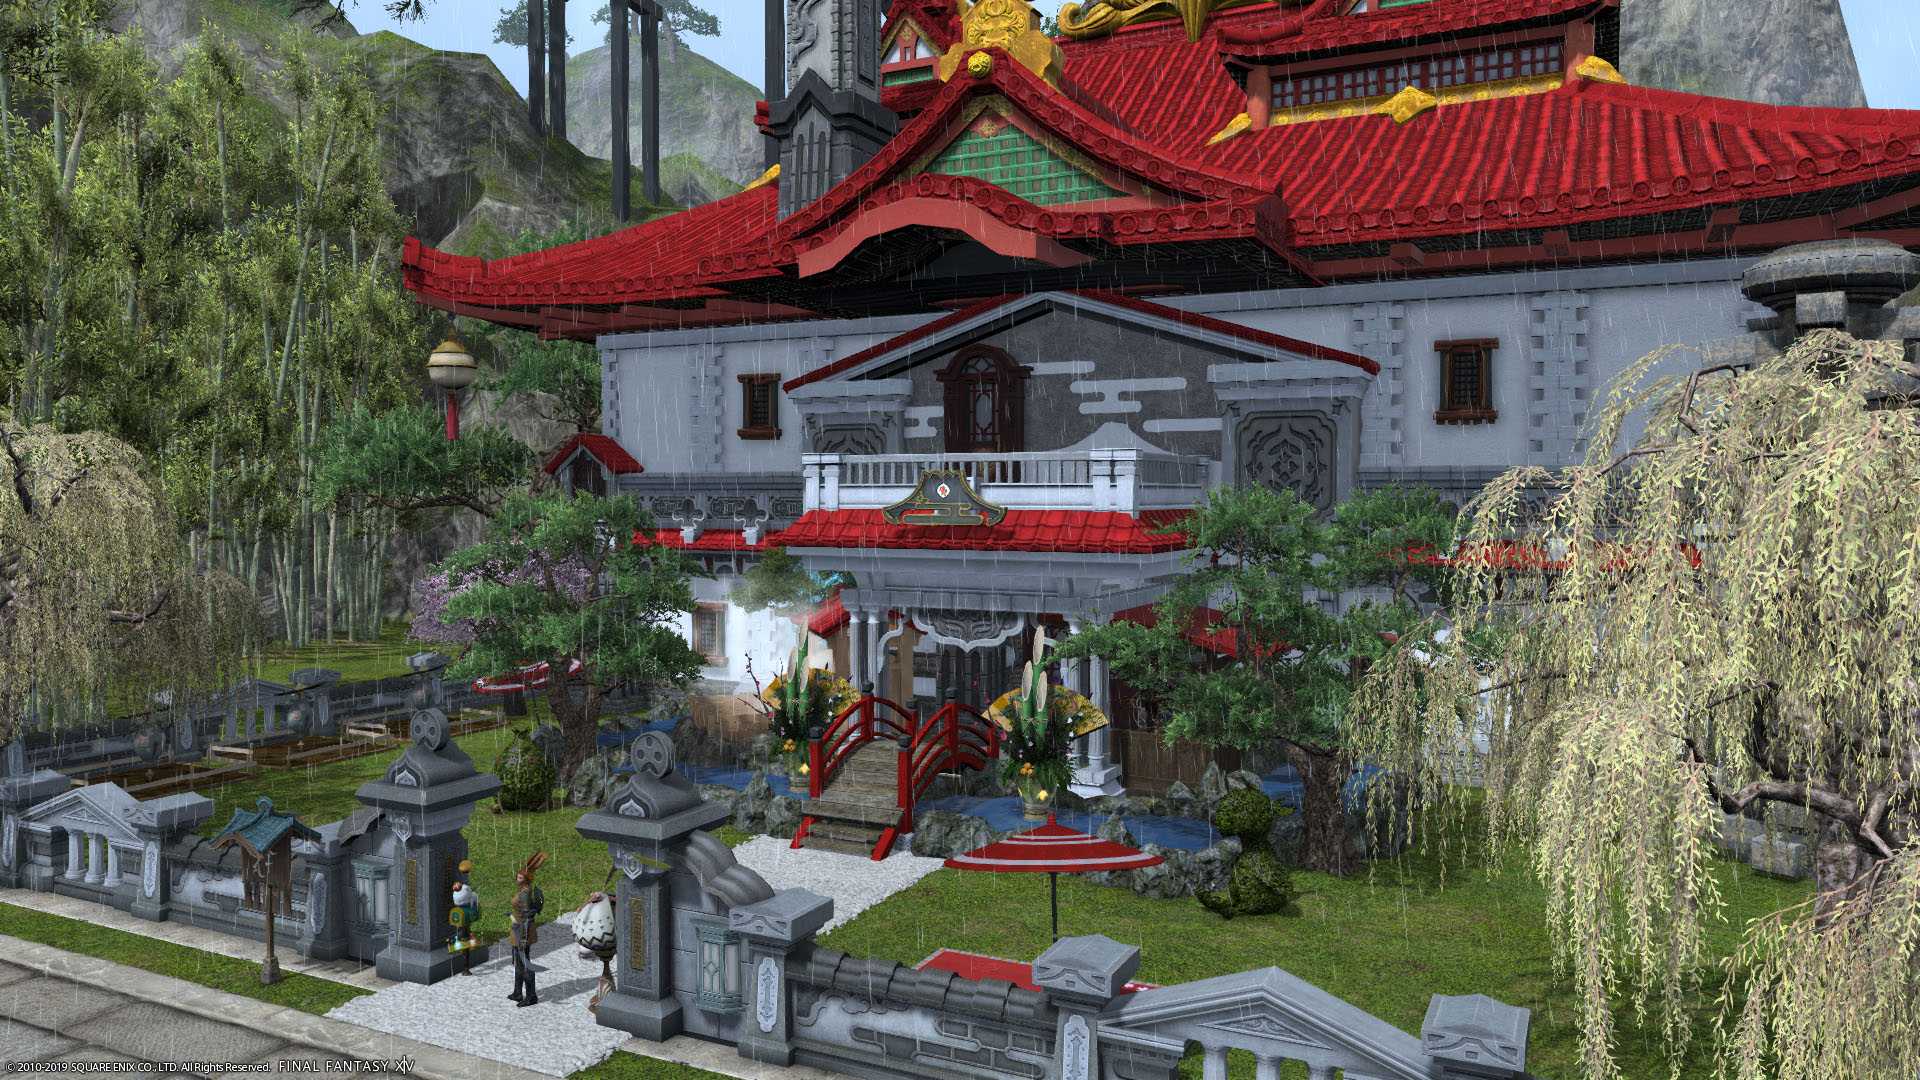
There are five different residential districts dotted around the world: lush Lavender Beds near Gridania, seaside residence Mist near Limsa Lominsa, carved-out desert canyon The Goblet near Ul’dah, Far Eastern settlement Shirogane near Kugane and frosty gothic Empyreum near Ishgard. You’ll need to do a quick quest in each area to unlock its respective housing ward, as seen below:
- Lavender Beds: Complete the level 10 quest Where the Heart Is (The Lavender Beds), given by Margeria at Bentbranch Meadows in Central Shroud.
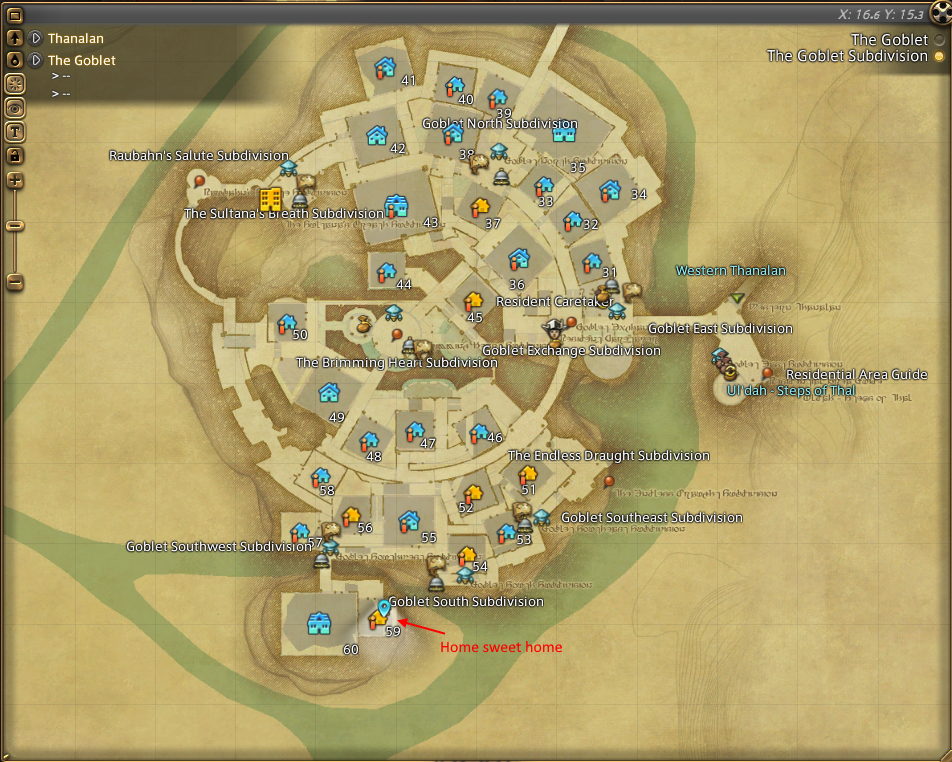
- Goblet: Complete the level 10 quest Where the Heart Is (The Goblet) by speaking to Imme at Scorpion Crossing in Western Thanalan.
- Mist: Complete the level 10 quest Where the Heart Is (Mist) by speaking to Ahctkoen at the Red Rooster Stead in Lower La Noscea.
- Shirogane: Complete the level 61 quest I Dream of Shirogane, given by Tsurubami in Kugane. You need to have reached the Stormblood expansion to unlock this area.
- Empyreum: Complete the level 60 quest Ascending to Empyreum given by Gondelimbaud next to the Foundation aetheryte. You need to have completed the majority of the Heavensward expansion to unlock this area.
(Image credit: Square Enix)
XP Buffs and Bonuses
- Preferred Server Bonus – New players who want to level quickly should pick the Preferred Servers when starting out to get the “Road to 70” buff which will double XP until level 70 for 90 days.
- Rested XP – Always remember to log out in a sanctuary to get the Rested 50% XP bonus which charges up to 1,5 levels. If you see a little moon symbol on your XP bar, you are earning rested XP, and the blue part of your XP bar is your accumulated XP.
- Food Buff – You will get a 3% XP bonus from eating food which isn’t much but you will also get stat bonuses and every bit helps. You can buy cheap food from vendors and any food will do. If you eat two pieces of food the time on the buff will stack up to an hour.
- Free Company – Most Free Companies have the Heat of Battle buff active which will give you a 5%-15% EXP bonus depending on the rank of the buff.
- Armory Bonus – The armory bonus is applied to all your classes below your highest level class. So if you are already level 80 in one class you will get a bonus on all your classes. 100% up to level 70, and 50% from 70 to 80.
- Item XP Buffs – Certain items will give you an XP bonus. Most of these are from pre-ordering expansions or buying the collector’s editions. The Friendship Circlet (20% to level 26) can is from the Recruit a Friend Program, and the Brand New Ring (30% to level 31) is easily attained from completing the Adventurers Guild Trials.