Bowazon Item setups
Ladder Starter Hammerdin Gear
Helm: 3 socketed helm with 3*15% Increased attack speed jewels
Amulet: Any amulet with +skill or + all resistances / The Cat’s eye / Atma’s Scarab
Weapon: Witchwild String socketed with 2 Shael runes
Switch Weapon: none
Shield: none
Switch Shield: none
Body Armor: Peace / Treachery
Belt: String of Ears / Nightsmoke / Razortail/ Rare belt with +resists or +life
Rings: Raven Frost/ Manald Heal / Rare or crafted dual leech rings
Gloves: Rare or Magic gloves with +20% IAS and other useful stats (+Bow and Crossbow skills is best)Boots: Waterwalk / Rare boots with 30% FRW +resists
Charms: Any charm with +skill, life, resist or FHR will help
Notes: Aim for 75% all resistances. You can use magic and rare items in any of your gear slots, and can also use them for your Mercenary.
Mercenary Gear
Helm: 3*Perfect Diamond socketed helmBody Armor: Any useful rare body armorWeapon: Insight Polearm
Advanced Bowazon Gear
Helm: Andariel’s visage (Socket it with Enhanced Damage / Increased attack speed jewel) / Magic Circlet with 30% Faster run and walk and 3 sockets (Socket it with Enhanced Damage / Increased attack speed jewels)
Amulet: Highlord’s Wrath / Atma’s Scarab
Weapon: Faith Grand Matron Bow with +3 to bow skills / Windforce socketed with Shael
Switch Weapon: Call to Arms
Shield: noneSwitch Shield: Spirit runeword Monarch
Body Armor: Fortitude Archon Plate / Enigma Archon Plate
Belt: String of Ears / Razortail
Rings: Raven Frost, Rare of crafted dual leech ring
Gloves: Dracul’s Grasp / Magic gloves with +20% IAS and +3 to bow and crossbow skills / Laying of HandsBoots: Gore Rider
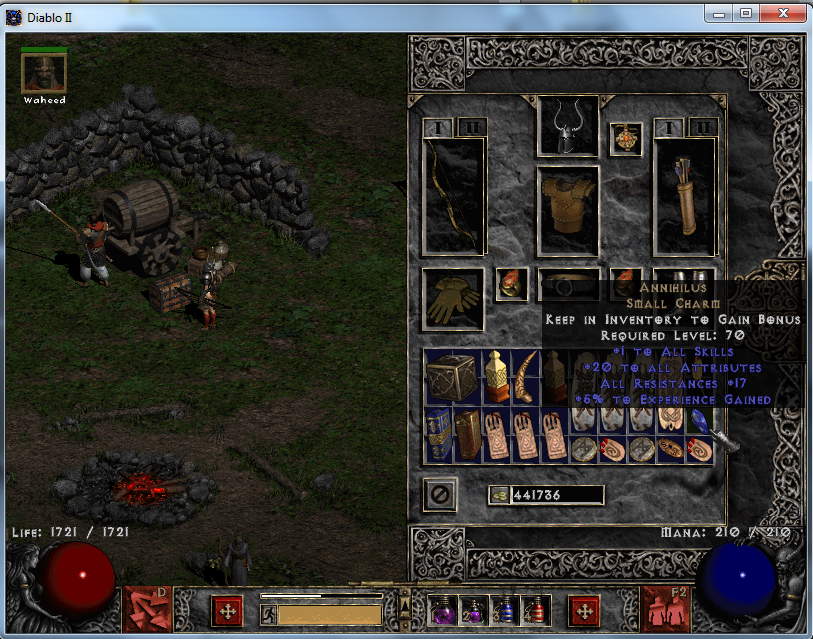
Charms: Annihilus, Hellfire torch, Gheed’s Fortune, Small Charms with @all resistances, life, faster hit recovery, attack rating, defense, maximum damage.
Mercenary Gear
Helm: Andariel’s Visage or Crown of Thieves (preferably ethereal, socketed with Ral/Um rune)Body Armor: Ethereal Fortitude or Treachery armorWeapon: Pride runeword in an elite two-handed ethereal Polearm, preferably Thresher
Magic Find Bowazon Gear
Helm: Harlequin Crest Shako (Socket it with Ist rune)
Amulet: 40-50% Magic Find amulet
Weapon: Faith Grand Matron Bow with +3 to bow skills / Windforce socketed with Shael
Switch Weapon: Call to Arms
Shield: noneSwitch Shield: Spirit runeword
Body Armor: Enigma Archon Plate
Belt: Upgraded Goldwrap
Rings: 2*Nagelring
Gloves: Chance GuardsBoots: War Traveler
Charms: Annihilus, Hellfire torch, Gheed’s Fortune, Small Charms with 7% Magic find (and also @all resistances if possible)
Mercenary Gear
Helm: Andariel’s Visage or Crown of Thieves (preferably ethereal, socketed with Ral/Um rune)Body Armor: Ethereal Fortitude or Treachery armorWeapon: Pride runeword in an elite two-handed ethereal Polearm, preferably Thresher
Hardcore Bowazon Gear
Helm: Crown of Ages (Socket it with 2*Ber rune)
Amulet: Metalgrid
Weapon: Faith Grand Matron bow with +3 to bow skills
Switch Weapon: Call to Arms
Shield: noneSwitch Shield: Spirit runeword
Body Armor: Ethereal Upgraded Guardian Angel socketed with Zod rune
Belt: String of Ears
Rings: Raven Frost, Rare or crafted dual leech ring with resists
Gloves: Dracul’s GraspBoots: Ethereal Sandstorm Trek
Charms: Annihilus, Hellfire torch, Gheed’s Fortune, Magic Small Charms (with +all resistances with +life or +faster hit recovery)
Note: Aim to overprotect yourself for situations when you get cursed with spells such as Lower Resist and Amplify Damage or get under an effect of an aura such as Fanaticism or Conviction.
Mercenary Gear
Helm: Andariel’s Visage or Crown of Thieves (preferably ethereal, socketed with Ral/Um rune)Body Armor: Ethereal Fortitude or Treachery armorWeapon: Ethereal Doom runeword in an elite Polearm base (preferably Thresher)
Hireling[]
Although many players solo with their characters, Hirelings can certainly increase the survivability of any character if maintained properly. Typically, most choose the Act 2 Defensive Mercenary in Nightmare Difficulty (the «Holy Freeze Merc») or the Offensive version (the «Might Merc»), but the others have plenty of potential if geared properly. The Helmet and Armor are standard choices, the only thing that would vary are the weapons. Act 3 Hirelings with cold attacks used to be popular, but are rare now due to many monsters being immune to their attacks. Although Barbarian Warriors are quite rugged, they can be overcome by large mobs. On the other hand, properly equipped, he can definitely play a major factor in increasing the character’s survivability. And the Rogue should not be counted out either, although without particular gear her ability to assist in later stages of the game diminishes by quite a bit. Although the weapons vary, the armor and helmet choices are mostly stock, with some variance in regards to armor.


Helmet
- Guillaume’s Face: Crushing Blow and Deadly Strike.
- Tal Rasha’s Horadric Crest: Mostly for the 10 percent life leech and +15 to Resistances.
- Crown of Thieves and Stealskull are also popular choices for their ease of finding and life leech.
- Kira’s Guardian or Darksight Helm: The reason for choosing either helmet is the Cannot Be Frozen attribute.
Armor
- Fortitude: 300% Enhanced damage against everything.
- Duress: Features 15% chance of Crushing Blow.
- Gladiator’s Bane: Cannot be Frozen and integer damage reduction at a level that actually makes a difference.
- Hwanin’s Refuge: Static Field proc. Still useful even if lightning immunes aren’t affected by it in Hell Difficulty.
- Treachery: may be of more benefit to a Rogue for the Increased Attack Speed.
- Skin of the Vipermagi: Iron Wolves can make better use of the Faster Cast Rate as they usually attack from range.
- Duriel’s Shell: For Hirelings, this armor is prized much for being relatively easy to find, its Cannot be Frozen attribute and Vitality bonus.
Rogue (Act 1)
- Faith: The Fanaticism aura and obscene damage are the big perks of this bow.
- Ice: The chief reason for this selection is the Holy Freeze Aura.
- Witchwild String: Amplify Damage proc and two sockets to customize it with.
- Riphook: Slows opponent and Open Wounds.
Desert Mercenary (Act 2)
- Hone Sundan: Crushing Blow and three sockets.
- The Reaper’s Toll: Decrepify Proc.
- Obedience: Crushing Blow and an Enchant Proc.
- Pride: The Concentration aura, especially when stacked with a Nightmare Offensive merc with Might, greatly increases the Amazon’s physical damage output.
- Infinity: Boasts a Conviction aura. A very popular rune word for those specialized in elemental attacks as it will break many elemental immunities.
- Insight: Has a Meditation Aura that will help alleviate mana demands.
- One could also add Breath of the Dying, Last Wish, Death or Doom as well, as these are very powerful. They are also equally difficult to create.
Iron Wolf (Act 3)
- Spirit Sword and Spirit Shield: This combination will give the hireling excellent resistance bonuses as well as a total +4 to their skill levels.
- Lidless Wall: Has +1 to all skills and a Faster Cast Rate bonus.
- Rhyme: Has Cannot Be Frozen and Faster Hit Recovery.
Barbarians (Act 5)
There are numerous swords that a Barbarian can use that listing them all would be impractical. Here are four uniques and four rune words particularly beneficial to them:
- Bloodletter: Fast, and has life leech. The sword will likely be obsolete by early Hell, however.
- Headstriker: Level dependent Deadly Strike as well as level dependent maximum damage.
- Azurewrath: The base damage is a bit low, but the added damage makes this blade frightening once it can be equipped.
- The Grandfather: Very high damage and Attack Rating bonus.
- Lawbringer: a relatively easy runeword to construct. Has a Decrepify proc.
- Breath of the Dying, Grief, and Death are also options, albeit difficult ones considering the runes required.
Кластерные самоцветы
Берем один выход на кластеры. Рекомендую брать большой кластерный самоцвет на урон хаосом. На нем есть 2 полезных для нас свойства:
- «Несказанные дары» даст 10% шанс противника взорваться, нанеся четверть своего здоровья в качестве урона хаосом в области. В комбинации со вторым таким свойством на уникальном кластере «Мания величия» у вас будет уже 20% шанс взрывов. Зачистка станет приятнее.
- Свойство «Нечестивая милость» дает 10% повышение скорости атаки и 30% увеличение урона хаосом, что достаточно много.
![]()
![]()
![]()
Средние кластеры можно взять на флаконы, но в моем случае я сделал выбор в сторону урона, а именно средних кластеров на постепенный урон. Лучшими свойствами на средних кластерных самоцветах будут:
- «Окружающее забвение» — увеличивает урон и длительность ядов.
- «Истощающий недуг» — ускоряет нанесение урона ядами.
![]()
![]()
Касаемо зачистки: у нас есть 4 пронзания на стрелах, но пролиферации ядов нет и чтобы быстрее бегать и быстрее фармить мы будем использовать «Носитель чумы».
При активации носителя мы сначала накапливаем отложенный урон ядами, а потом разряжаем этот урон в области, очень быстро сдувая противников. В целом билд достаточно контактный.
Гибридный убийца
Монах
Если вы не можете выбрать между Мастером боевых искусств и Трассиссином, не волнуйтесь! Монах – это гибридная сборка, в которой используются навыки обоих разных деревьев. Он зависит от AoE-урона, поэтому убедитесь, что ваш стиль игры соответствует этому.
Phoenix Strike и Dragon Talon потребуют по 20 очков, а Death Sentry, Shadow Master и Claw Mastery получат 19, 17 и 16 очков соответственно. Такие умения, как Fade, Burst of Speed и Cloak of Shadows, всегда стоит того, чтобы на них потратить очко.
Как вы уже привыкли к этому моменту, Силу и Ловкость нужно довести до уровня предмета, тогда Жизнеспособность заберет оставшиеся очки.
1
1
голос
Рейтинг статьи
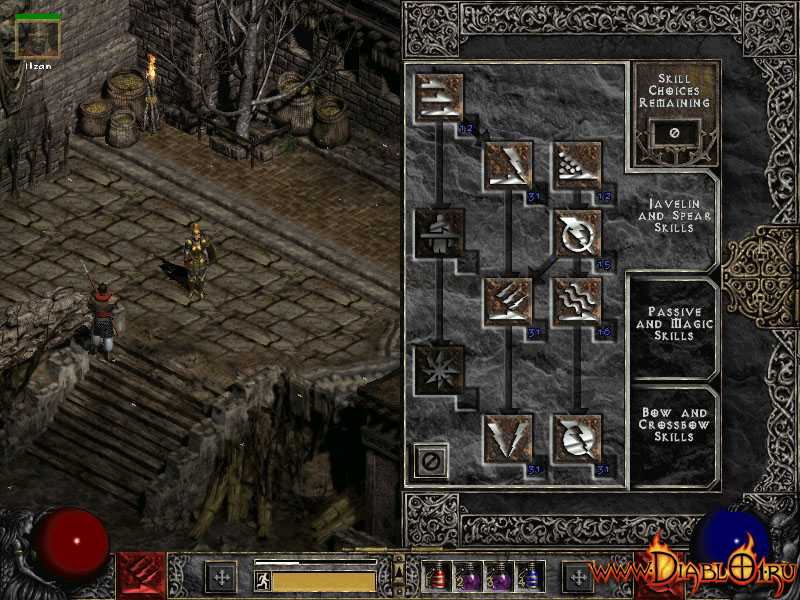
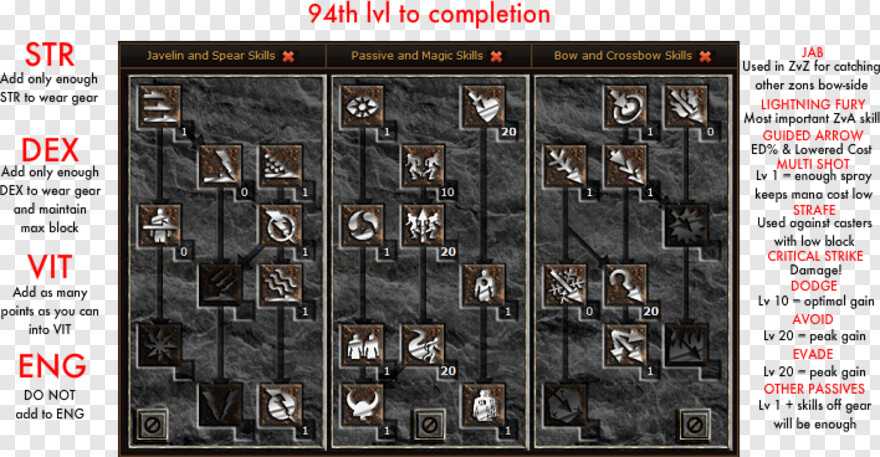
Skills for the Multishot Bowazon in Diablo II: Resurrected Patch 2.7 & Ladder Season 4
- Multiple Shot
- Guided Arrow
- Critical Strike
- Penetrate
- Valkyrie
Passive and Magic Point Distribution for Multishot Bowazon
| Skill | Min cLvl | Description | |
| Inner Sight1 point | 1 | Prerequisite for Valkyrie | |
| Critical Strike20 points | 1 | Critical Strike grants a chance that the Amazon’s strike does double damage. It starts at 16% at level 1, increases steeply until level 7, and then progresses more slowly to level 20 at 68%. Works with all Bow skills. Still, given how many strikes you generate using Multishot, it’s a winner. | |
| Dodge1 point | 6 | Prerequisite for Valkyrie | |
| Slow Missiles1 point | 12 | Prerequisite for Valkyrie | |
| Avoid1 point | 12 | Prerequisite for Valkyrie | |
| Penetrate 20 points | 18 | Penetrate stacks Bonus Attack rating substantially and is a must-have. It’s also the primary damage synergy for your Valkyrie. It will affect your choice of Mercenary, which will be discussed in the Mercenary section. | |
| Decoy 2 points | 24 | Prerequisite for Valkyrie. Decoy does provide some synergy to Valkyrie, so it’s a good place to put the spare point left over at the end. | |
| Evade1 point | 24 | Prerequisite for Valkyrie | |
| Valkyrie20 points | 30 | The Valkyrie is a summoned minion that acts as an effective tank/decoy for you. In addition, at high levels, Valkyries can have random immunities. Dodge, Evade, and Avoid all serve as passive immunities for both of you, but it’s better to put those points into the Valkyrie directly. Penetration also offers important damage synergies to the Valkyrie, which is why this is maxxed out. She’s pretty survivable without many points into Decoy for Life, even at higher Hell levels, and she can be resummoned at will anyway. | |
| Pierce1 point | 30 | You’ll get 100% Pierce on your endgame bow, but you don’t want to be entirely without it until then. There are other equipment alternatives for Pierce as well, which will be discussed in the Equipment section. Pierce does not work with Guided Arrow, your major secondary attack. |
Bow and Crossbow Point Distribution for Multishot Bowazon
| Skill | Min cLvl | Description | |
| Magic Arrow1 point | 1 | Prerequisite for Multiple Shot. | |
| Multiple Shot20 points | 6 | While you will want to max Multiple Shot for mass farming goodness — don’t do it right away. It’s a mana-hungry spell, so resist overinvesting too early — no more than 4-5 points until you have a Mercenary with the Insight runeword to make up for it. Later, you’ll get enough items with good mana/life leech. Multishot splits a single arrow or bolt into multiples, spraying across a cone in front of the Amazon. You net an extra arrow with each level, starting with 4 and reaching 23 by level 20 (it’ll continue to improve with +Skill items on top). However, mana costs also rise. It’ll be your primary attack mode in large groups and particularly in Hardcore/PvP play. Combined with a Cold Damage charm, even a small one, it can also help with crowd control. The cone is wide at higher levels, meaning you’ll end up with some wasted shots. As of patch 2.4, Multishot gains a 12% Physical Damage bonus per level of Guided Arrow. | |
| Cold Arrow1 point | 6 | Prerequisite for Guided Arrow | |
| Guided Arrow20 points | 18 | Guided Arrow is a great deal of fun. It will always hit its nearest target, even if it has to swerve crazily to do so. It’s great for dealing with tight spaces, twisting corridors, or that mob you can hear but can’t quite see off screen.It also includes a percent damage bonus with each level, and mana costs reduce with each level. Guided Arrows can be blocked, so while it will always hit, damage isn’t assured. They also do not work with Pierce. However, the damage bonus increases from 5% to 7% per level in Patch 2.4. It also gains a 12% Physical Damage bonus from each level of Multiple Shot. |
7 луков
- Плюсы : Быстрые дальние атаки.
- Минусы : атаки ограничены боеприпасами.
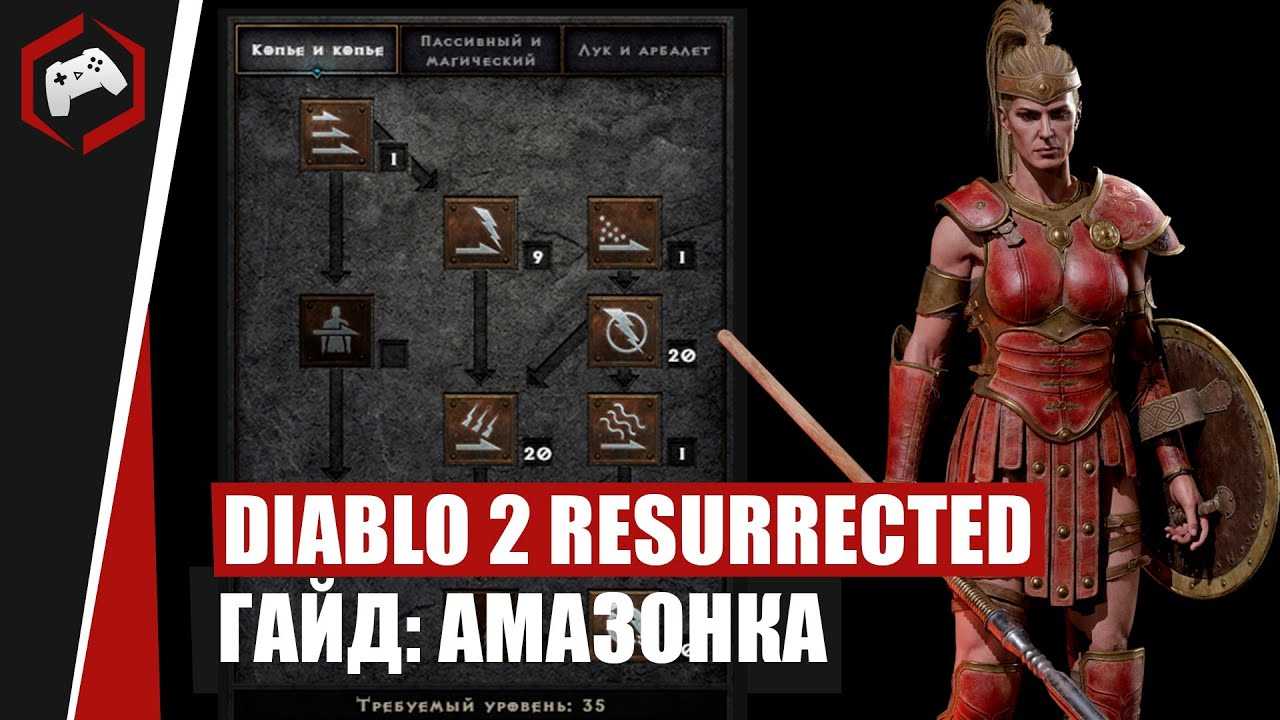
- Примечательное руническое слово : вера (Ом + Джа + Лем + Eld)
В то время как все классы могут использовать луки, не многие из них могут по-настоящему максимизировать оружие, как амазонки. У нее есть древо навыков, посвященное лукам и арбалетам, что означает, что это оружие было создано для нее. Даже обычные атаки луком лучше всего делать в руках компетентного амазонки.
Тем не менее, это не означает, что луки бесполезны в руках других классов. На ранних этапах игры, особенно при повышении уровня сложности на Нормальном уровне, луки могут быть находкой. Они позволяют игрокам быстро набирать опыт , уничтожая своенравных врагов.
Доспехи Амазонок, история
Примитивные жители Скартары не особенно продвинуты в оружейном деле, за исключением лунных фурий Скариаса. Из-за болот вокруг дельты реки, уклонение от метательного оружия невозможно, и в ответ лунные фурии разработали одни из самых прочных и тяжелых щитов, когда-либо созданных, в том числе легендарный Сетцшильд.
Некоторые выжившие исследователи также принесли образцы экзотических головных уборов племен, от тяжелых стальных цервельеров, до злобных шлемов эйнхериев, которые носили дикие приверженцы Хароса, когда они потребляли нектар крови и катались по ночному небу на пылающих лошадях, чтобы охотиться за жертвоприношениями. По крайней мере, это было то, что вспомнил один особо сумасшедший и полусгоревший выживший сразу после того, как он выпил несколько бутылок с алкоголем и прежде, чем он сотню раз выкрикнул имя Хароса и прыгнул за борт.
- Шлем Амазонки
- Классовый щит: щит Амазонки
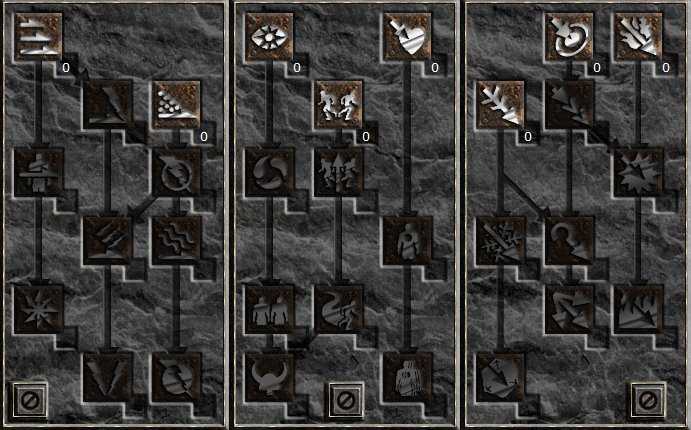
Молниеносный Явазон
- 20 очков Заряженного удара
- 20 очков Удар молнии
- 20 очков Ярость Молнии
- 20 очков Мощный удар
- 5 очков Пронзание
- 5 очков Critical Strike
- 5 очков Уклонение
- 5 очков Aviod
- 5 очков Уклонение
Как и боазоны, явазоны представляют собой большой зонт с несколькими различными специализациями, которые игроки могут использовать. Лично мы предпочитаем молниеносных явазонов из-за их сочетания высокого урона и надежной защиты. Им также не нужно самое сильное снаряжение, что делает их отличным вариантом для игроков, которые не хотят тратить много времени на фермерство.
Явазоны должны вкладывать достаточно очков в Силу и Ловкость, чтобы иметь возможность экипировать нужные им предметы. Затем все остальное идет в Жизнеспособность, чтобы помочь им выжить. Не нужно тратить лишние очки на Энергию, потому что снаряжение обеспечит их необходимой маной.
Опять же, снаряжение здесь не самое главное, но вы все равно должны обратить внимание на некоторые ключевые атрибуты. Вы должны искать снаряжение с бонусами к сопротивлению, мане, здоровью, повышенной скоростью атаки и всем тем, что добавляет очки к вашим навыкам
Однако среди снаряжения более высокого класса вам стоит обратить внимание на копья Titan’s Revenge или Thunderstroke, а также на руны Enigma (броня) и Spirit (щит).
Любой из этих вариантов должен сослужить вам хорошую службу в борьбе с полчищами Диабло. Тем не менее, эти два типа амазонок довольно универсальны, так что не стесняйтесь играть с билдами, чтобы найти то, что подходит вашему стилю игры.
Гайды
19 сентября 2021
(1 260 голосов)
Summary
- This build is a «Glass Cannon»! Make sure to know your surroundings, and use your tanks to open space for maneuvering. Your main focus is to keep your distance from threats!
- Your projectiles piercing multiplies your total DPS significantly, make sure to line up your targets to maximize the hits per shot.
- Chance to Dodge is a blessing and a curse. If you have fanaticism your animation is much faster, but before that you may get «stuck» infinitely dodging.
- magicarrow doesn’t use any quantity of your Arrows! Use this if you’re running low or finishing off a boss.
- The new Seasonal Runeword Hustle has opened the door for MASSIVE min-maxing potential! See the and sections to learn how to incorporate it into your gear.
It’s incredibly satisfying to fill your screen with arrows, and watching Diablo’s minions fall by the scores! We hope you enjoy running this high intensity Amazon build!
Good luck! In bocca al lupo!
Лучший Билд Некроманта — Призыватель Diablo 2: Resurrected
Как упоминалось ранее, ваши скелеты нежити будут нести вас через каждое действие. Призыв — ваш главный навык в начале игры. Сосредоточьте свои очки на этой способности, пока вы не сможете призвать до 12 скелетов одновременно. Мастерство скелетов так же важно для улучшения, как и навсегда увеличивает жизнь и урон вашей армии нежити. Чтобы разнообразить вашу армию нежити, добавьте очки в Clay Golem, чтобы танковать за вас некоторый урон. После того, как ваши призванные миньоны убили несколько врагов, используйте Corpse Explosion на убитом противнике, чтобы нанести урон по области всем ближайшим противникам. Этот навык может быть не впечатляющим на начальном этапе, но позже он становится одним из лучших навыков прямого урона и чрезвычайно эффективен на более сложных уровнях сложности. Также стоит использовать Decrepify, чтобы проклясть группу врагов, замедляя их и увеличивая получаемый ими урон
После того, как ваши призванные миньоны убили несколько врагов, используйте Corpse Explosion на убитом противнике, чтобы нанести урон по области всем ближайшим противникам. Этот навык может быть не впечатляющим на начальном этапе, но позже он становится одним из лучших навыков прямого урона и чрезвычайно эффективен на более сложных уровнях сложности. Также стоит использовать Decrepify, чтобы проклясть группу врагов, замедляя их и увеличивая получаемый ими урон
После того, как ваши призванные миньоны убили несколько врагов, используйте Corpse Explosion на убитом противнике, чтобы нанести урон по области всем ближайшим противникам. Этот навык может быть не впечатляющим на начальном этапе, но позже он становится одним из лучших навыков прямого урона и чрезвычайно эффективен на более сложных уровнях сложности. Также стоит использовать Decrepify, чтобы проклясть группу врагов, замедляя их и увеличивая получаемый ими урон.
Прокачка статов призывателя
Очки характеристик для сборки Призывателя предельно просты — увеличьте свою силу до 26, чтобы владеть определенными предметами, а остальные свои очки сбросьте в жизнеспособность . У Некроманта не самая прочная броня, и если враги прорвутся сквозь вашу армию, вам понадобится много здоровья для защиты от входящих атак. Вы можете не вкладывать очки характеристик в ловкость и энергию, поскольку Некроманту не нужна ни одна из этих характеристик.


![Diablo 2: resurrected: лучшие билды на всех персонажей [гайд]](https://cosplay-shop.ru/wp-content/uploads/4/2/9/4291a0d5b3a5dc4a5f1792cdf053a846.jpeg)

Прокачка навыков
Вот все навыки, необходимые для повышения уровня сборки Призыватель Diablo 2 Resurrected:
- Поднять скелет — 20
- Мастерство скелета — 20
- Взрыв трупа — 20
- Глиняный голем — 10
- Оживить — 10
- Мастерство голема — 8
- Сопротивление призыву — 1
- Зубы — 1
- Усиление урона — 1
- Ослабить — 1
- Террор — 1
- Decrepify — 1
- Меньшее сопротивление — 1
- Железная дева — 1
- Жизнеотвод — 1
![]()
Снаряжение для Призывателя
- Оружие — Топор берсерка с руническим словом Зверь (Бер, Тир, Ум, Мал и Лум)
- Щит — Монарх, вооруженный руническим словом Духа (Тал, Тул, Орт и Амн)
- Шлем — Арлекин Герб (Шако)
- Доспехи — Магическая пластина с руническим словом Enigma (руны Jah, Ith и Ber)
- Belt — Arachnid Mesh (кушак из паутины)
- Кольца — Камень Иордании и Обручальное кольцо Буль-Катоса
- Амулет — калейдоскоп Мары
- Перчатки — Magefist (Легкие рукавицы)
- Сапоги — Marrowwalk (Ботинки Boneweave)
- Амулеты — Факел Адского Пламени (большой амулет) , Аннигилус (маленький амулет ) и великий амулет Graverobber
Все это оборудование увеличивает выживаемость и урон армии Некроманта за счет баффов характеристик, дополнительных навыков и более высокой скорости каста. Один из самых важных баффов происходит от слова руны Зверя. Это дает Некроманту ауру Фанатизма 9 уровня, навык, который обычно является эксклюзивным для Паладина. Фанатизм наделяет всю вашу группу атакующей аурой, резко увеличивая урон, скорость атаки и рейтинг атаки.
Наемник Призывателя
Мы специально ищем атакующего наемника, чтобы дать нашей группе умение Паладина: Might Aura. Вы можете расширить эти баффы, используя приведенное ниже оборудование, чтобы дать вашим миньонам дополнительные атакующие ауры.
- Оружие — Жнец (Молотильщик) с руной Ом
- Доспехи — Boneweave с руническим словом Предательство (Шаэль, Тул и Лем)
- Шлем — Корона воров (Великая корона)
Это то, что вам нужно, чтобы собрать лучшую сборку Некроманта в Diablo 2 Resurrected. Теперь же давайте разберем класс Некроманта на косточки и посмотрим, на всю его статистику значительно глубже!
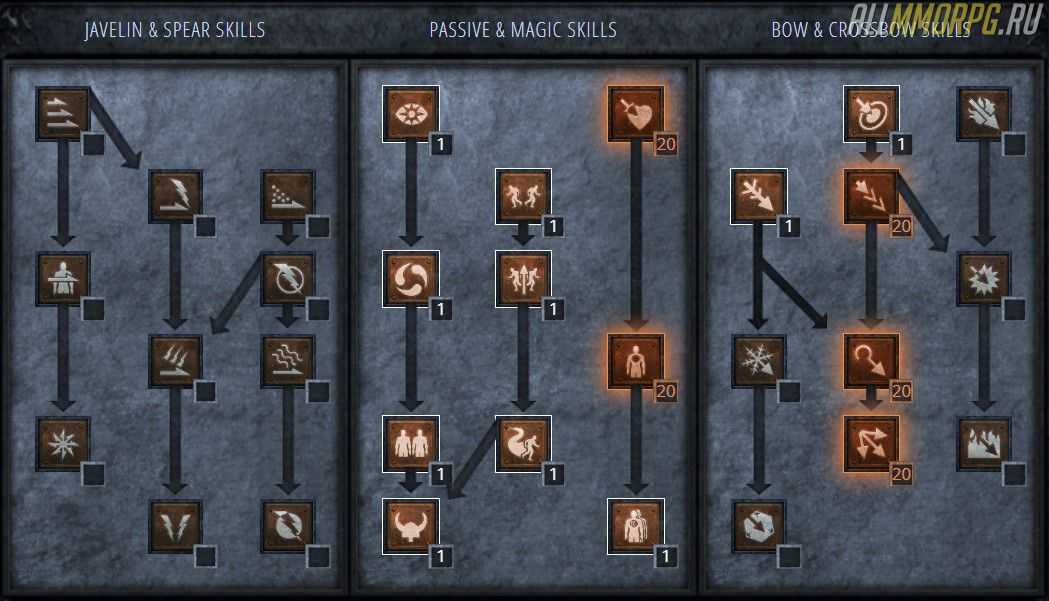
Skills
|
Cold Arrow |
20 |
Ice Arrow
20
Freezing Arrow
20
Critical Strike
10
Penetrate
4
Pierce
10
Inner Sight
1
Slow Missiles
1
Decoy
1
Dodge
1
Avoid
1
Evade
1
Valkyrie
20
The Amazon has some of the best endgame skills for any class and this build makes good use of them. Freezing Arrow should always be active, with Cold Arrow and Ice Arrow also maxed out to support it. Freezing Arrow gives the Amazon crowd-control capabilities and group damage. This is enhanced by the Valkyrie, who takes all the advantages of the Amazon and magnifies them. The Valkyrie alone can clear most content without any help.
Our friends over at Icy Veins have a skill calculator (as seen here) for those who would like to customize the skills for themselves!